When accessing localhost via HTTPS, browsers usually display a security warning because they don’t recognize self-signed certificates. To fix this, you can use mkcert, a tool that generates valid SSL certificates trusted by browsers automatically. This is the fastest way to set up HTTPS on localhost without warnings.
Installing SSL on Localhost with mkcert
Step 1: Install mkcert on Ubuntu
Run the following commands to install mkcert:
sudo apt install libnss3-tools -y
cd /tmp
curl -JLO "https://dl.filippo.io/mkcert/latest?for=linux/amd64"
sudo chmod +x mkcert-v*-linux-amd64
sudo cp mkcert-v*-linux-amd64 /usr/local/bin/mkcert
Then, verify that mkcert is installed:
mkcert --versionStep 2: Create a Certificate Authority (CA) on Your PC
mkcert requires a local CA to generate valid certificates for localhost. Run:
mkcert -installThis command will create a root CA and add it to the system’s trusted CA list. You should see a confirmation message similar to the screenshot below.

Step 3: Generate an SSL Certificate for Localhost
If you manage multiple projects, it’s best to create SSL certificates based on the domain or project name for better organization. In this guide, I’ll use dev.itsmeit.co as an example. To make this domain work on localhost, map it to 127.0.0.1 by editing the /etc/hosts file:
sudo nano /etc/hostsAdd the following line:
127.0.0.1 dev.itsmeit.coSave the file — dev.itsmeit.co will now function as a domain localhost mapped to your machine.
Navigate to the directory where you want to store the certificate files. If using Nginx, a common location is /etc/nginx/ssl/dev.itsmeit.co:
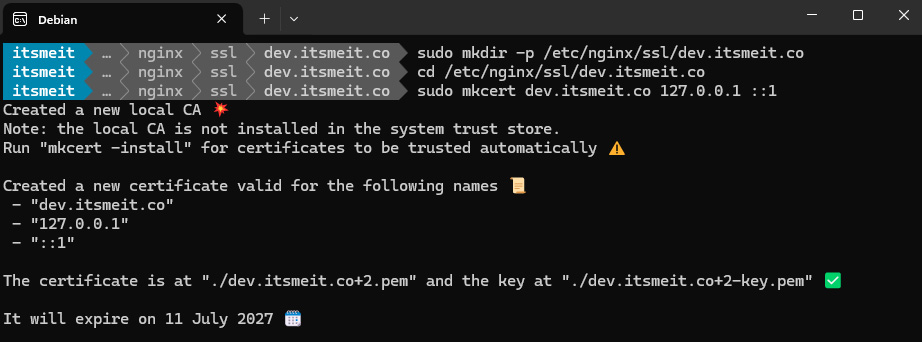
sudo mkdir -p /etc/nginx/ssl/dev.itsmeit.co
cd /etc/nginx/ssl/dev.itsmeit.co
sudo mkcert dev.itsmeit.co 127.0.0.1 ::1
This command generates two files:
dev.itsmeit.co+2.pem→ SSL certificatedev.itsmeit.co+2-key.pem→ Private key

You can store these files in any directory of your choice.
Configuring SSL in Nginx or Apache
🛠 Configuring SSL in Nginx
Open the Nginx configuration file:
sudo nano /etc/nginx/sites-available/dev.itsmeit.co.cnfAdd or update the SSL configuration:
server {
    listen 443 ssl;
    server_name dev.itsmeit.co;

    ssl_certificate  /etc/nginx/ssl/dev.itsmeit.co/dev.itsmeit.co+2.pem;
    ssl_certificate_key  /etc/nginx/ssl/dev.itsmeit.co/dev.itsmeit.co+2-key.pem;

    location / {
        root /var/www/html;
        index index.html;
    }
}
The key parts here are:
listen 443 ssl;→ Enables SSL on port 443.ssl_certificateandssl_certificate_key→ Specify the paths to the SSL files.
Check the Nginx configuration:
sudo nginx -tIf no errors appear, restart Nginx:
sudo systemctl restart nginx🛠 Configuring SSL in Apache
Open the Apache SSL configuration file:
sudo nano /etc/apache2/sites-available/dev.itsmeit.co.confModify the SSL settings:
<VirtualHost *:443>
    ServerName dev.itsmeit.co

    SSLEngine on
    SSLCertificateFile /etc/apache2/ssl/dev.itsmeit.co.pem
    SSLCertificateKeyFile /etc/apache2/ssl/dev.itsmeit.co-key.pem

    DocumentRoot /var/www/html
</VirtualHost>
Save the file, enable the SSL module, and restart Apache:
sudo a2enmod ssl
sudo systemctl restart apache2
🛠 Configuring SSL in Docker
If running your application inside Docker, ensure the container can access the SSL certificates.
Mount SSL Certificates into a Docker Container
After generating SSL certificates with mkcert, mount them into the container:
docker run -d
  --name my-nginx
  -v /etc/docker-certs:/etc/nginx/certs:ro
  -p 443:443
  my-nginx-image
Using Docker Compose
If you’re using Docker Compose, update the docker-compose.yml file:
version: "3"
services:
  nginx:
    image: nginx:latest
    ports:
      - "443:443"
    volumes:
      - /etc/docker-certs:/etc/nginx/certs:ro
Then restart the services:
docker-compose up -dConfiguring Your Browser to Recognize the SSL Certificate
Run the following command in the terminal to locate the mkcert CA certificate:
echo $(mkcert -CAROOT)
ls $(mkcert -CAROOT)
Now that you know the file path, import the CA certificate into your browser.
✅ Google Chrome
- Open
chrome://settings/security - Click Manage Certificates → Go to the Authorities tab.
- Click Import, select the CA file (
$(mkcert -CAROOT)/rootCA.pem). - Check Trust this certificate for identifying websites.
✅ Firefox
- Open
about:preferences#privacy - Scroll to Certificates and click View Certificates.
- Go to the Authorities tab, click Import, and select
rootCA.pem. - Check Trust this CA to identify websites.
After completing these steps, refresh the page, and HTTPS should work properly.
Alternatively, you can verify SSL using this command:
openssl s_client -connect dev.itsmeit.co:443 -servername dev.itsmeit.coCommon Errors & Solutions
1. Why does my browser show “NET::ERR_CERT_AUTHORITY_INVALID” after installing SSL?
Browsers don’t trust self-signed certificates by default. You need to import the mkcert CA certificate into your system and browser to fix this issue.
2. Why does Apache show “SSL: Can’t open certificate file”?
Apache cannot access the certificate file due to incorrect paths or insufficient permissions. Double-check the Apache configuration and ensure the SSL files have proper read permissions.
3. SSL is configured, but localhost doesn’t load with HTTPS?
Possible causes:
- The browser is caching an old HTTP connection.
- The
/etc/hostsfile is incorrectly configured.
Check the /etc/hosts file to ensure your domain maps to 127.0.0.1 and clear your browser cache.
4. How do I verify the SSL certificate on localhost?
Click on the lock icon next to the URL → Click Connection is secure → View Certificate details.
5. mkcert SSL still shows a browser warning?
Even after adding the self-signed certificate, Chrome may still display a warning. This is usually caused by a cached certificate. Run:
sudo update-ca-certificates --freshThen clear your browser cache or restart your system. This usually resolves the issue.
I used to struggle with setting up SSL on localhost because browsers kept flagging self-signed certificates as unsafe. However, after exploring different methods, I found that mkcert is the quickest and most reliable way to generate trusted certificates for local development.
If you run into issues, check each step carefully or re-import the mkcert CA certificate in your browser. Enabling HTTPS on localhost not only improves security but also makes your development environment closer to production.
🔗 Reference:mkcert GitHub