FileZilla is a free and open-source FTP/SFTP client application that supports FTP, FTPS over TLS/SSL, and SFTP protocols. It helps you connect to and manage your hosting servers and VPS in a simple and secure way. Wondering how to install FileZilla on Ubuntu 22.04, 24.04, or other Linux distributions? Don’t worry! The detailed guide below will help you easily set up FileZilla and efficiently manage your server files.
Why Choose FileZilla?
- User-friendly interface – FileZilla offers an intuitive interface with easy-to-navigate features, making it ideal for both beginners and experienced users.
- Cross-platform compatibility – Available for Windows, macOS, and Linux, FileZilla allows seamless file management across different operating systems.
- Support for various protocols – Beyond FTP, FileZilla supports FTPS (FTP Secure) and SFTP (SSH File Transfer Protocol) for secure file transfers.
- Powerful features – Enjoy features like site manager, directory comparison, remote file editing, and transfer queue for efficient file management.
Features of FileZilla
✅ Site Manager and Transfer Queue
✅ Drag & Drop file support
✅ Customizable upload/download speed limits
✅ Filename filtering
✅ Folder comparison
✅ IPv6 support
✅ Multi-language support
✅ Resume file transfers and support for large files (>4GB)
✅ Edit files directly on a remote server
✅ Keep-alive mode
✅ Supports HTTP/1.1, SOCKS5, and FTP Proxy
✅ Synchronized folder browsing
✅ Search for files on a remote server
✅ Tabbed interface for managing multiple connections simultaneously
2 Steps Install FileZilla on Linux/Ubuntu
Step 1: Update Your System
Before installing any new software, it is crucial to update your system’s package list. Open your terminal by pressing Ctrl + Alt + T and run the following command:
sudo apt updateStep 2: Install FileZilla
You can install FileZilla in three different ways, depending on your needs:
📌 #1: Install FileZilla via APT (The Easiest Method)
FileZilla is available in the Ubuntu software repository. You can install it using:
sudo apt install filezilla📌 #2: Install FileZilla via PPA (If APT Does Not Work)
If you encounter issues installing FileZilla via APT or want a newer version, you can use a Personal Package Archive (PPA):
sudo add-apt-repository ppa:xtradeb/apps
sudo apt update && sudo apt install filezilla -y
If this PPA does not work, try another one:
sudo add-apt-repository ppa:sicklylife/filezilla
sudo apt update && sudo apt install filezilla -y
📌 #3: Install the Latest FileZilla Version via Flatpak
If you want the latest version of FileZilla instead of the one in the APT repository, install it through Flatpak:
Step 1: Install Flatpak (if not already installed)
sudo apt install flatpak -yStep 2: Add the Flathub repository
flatpak remote-add --if-not-exists flathub https://flathub.org/repo/flathub.flatpakrepoStep 3: Install FileZilla from Flathub
flatpak install flathub org.filezillaproject.Filezilla -yStep 4: Run FileZilla
flatpak run org.filezillaproject.FilezillaLaunch FileZilla and Integrate FileZilla with Text Editors
Once installed, you can launch FileZilla from the Applications menu or by running:
Start Filezilla and add icon to taskbar
filezillaAlternatively, search for “FileZilla” in the menu and click “Add to Favorites” to pin it to the taskbar.
Integrate with Sublime Text, VS Code, etc.
You can edit files directly from FileZilla using your favorite text editor:
Steps:
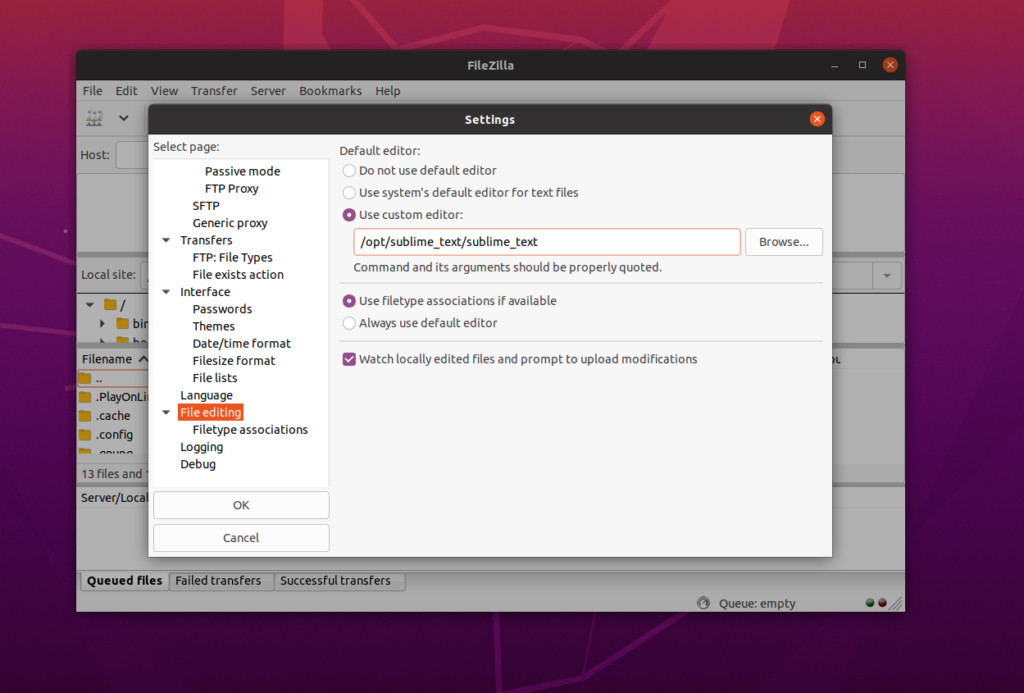
1️⃣ Open FileZilla and go to Edit → Settings → File Editing.
2️⃣ Under Default Editor, select Use custom editor.
3️⃣ Click Browse and select your text editor (e.g., /opt/sublime_text/sublime_text).
4️⃣ Click OK to save the settings.

Now, you can right-click any file and select View/Edit to edit directly! 🎯
Connect to VPS/Hosting Servers
To connect FileZilla to your hosting or VPS:
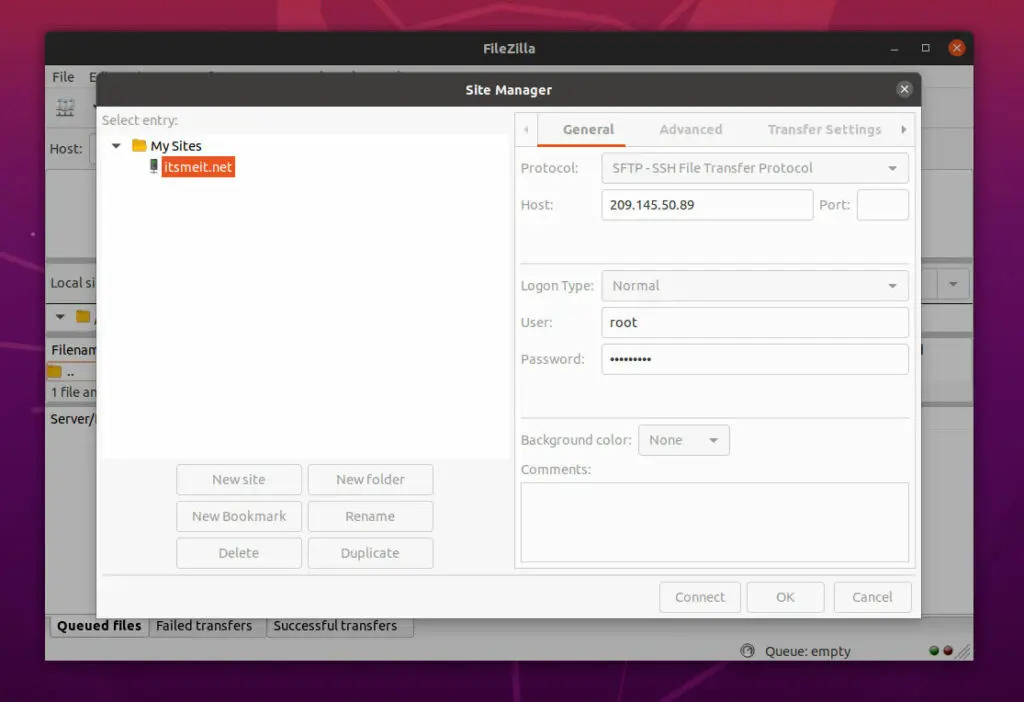
1️⃣ Click the Site Manager icon (first icon under the “File” menu).
2️⃣ Enter your hosting/VPS information, including:
- Connection type (FTP, SFTP)
- Host
- Port
- Key file (if required)

Troubleshooting Common Issues
🔹 FileZilla does not start
👉 Run the following command to fix missing dependencies:
sudo apt --fix-broken install🔹 Error: “Could not connect to server”
👉 Check if you have entered the correct Host, Username, Password, and Port.
👉 If the issue persists, navigate to Edit → Settings → Connection → Passive Mode, and select Use Passive Mode.
🔹 FileZilla not found in the application menu
👉 If installed via Flatpak, update the application list:
flatpak update🔹 Unable to connect to VPS using SFTP on FileZilla (Ubuntu)
👉 FileZilla on Linux/Ubuntu only supports SSH keys in .ppk format.
👉 If you are using id_rsa or .pem, you need to convert your key to .ppk before using it.
For detailed instructions on generating and using SSH keys on Linux, you can refer to the [SSH key setup guide].
With these steps, you should be able to install and use FileZilla on Ubuntu 22.04 / 24.04 LTS without any issues.