Exim4 is a powerful tool that makes it easy to set up a mail server on Ubuntu/Linux. This article will guide you through the basic steps to install and configure Exim4, enabling your system to send and receive emails efficiently.
Step 1: Install Exim4
Before installing Exim4, it is important to ensure that no other mail services are installed on the system. If any are present, please remove them.
Next, open the terminal and log in to the server via SSH. Once logged in, execute the following command to install mail server on Linux/Ubuntu :
sudo apt-get update
sudo apt install exim4 mailutils -y
sudo dpkg-reconfigure exim4-config
After running the command to install Exim4, Exim will prompt you to configure various settings. To properly configure the mail server on Ubuntu/Linux for sending emails, please follow these steps:
- General type of mail configurations: internet site; mail is sent…
- System mail name: enter your domain name like (itsmeit.co)
- IP-Address to listen on for incoming SMTP connections: 127.0.0.1
- Other destinations for which mail is accepted: enter your domain name like (itsmeit.co)
- Domain to relay email for: leave blank
- Keep number of DNS-queries minimal (Dial-on-Demand)?: No
- Split configuration into small files?: No
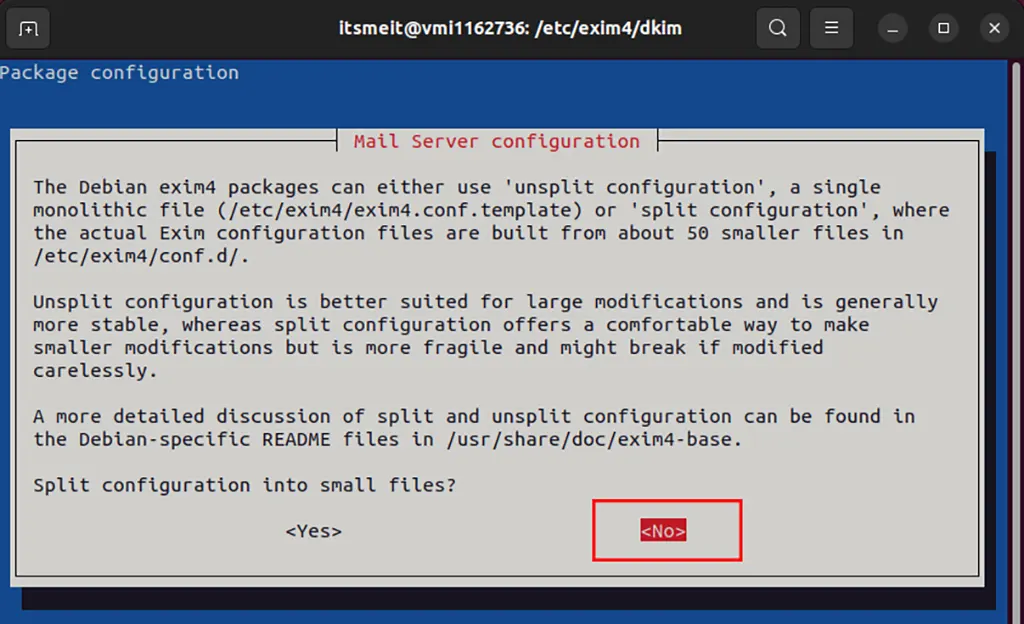
Note: If desired, you can manually edit the mail server configuration on Linux by opening the file “/etc/exim4/update-exim4.conf.conf” and modifying the following parameters:
sudo nano /etc/exim4/update-exim4.conf.confdc_eximconfig_configtype='internet'
dc_other_hostnames='itsmeit.co' #replace it with your domain name
dc_local_interfaces='127.0.0.1'
dc_readhost=''
dc_relay_domains=''
dc_minimaldns='false'
dc_relay_nets=''
dc_smarthost=''
CFILEMODE='644'
dc_use_split_config='false'
dc_hide_mailname=''
dc_mailname_in_oh='true'
dc_localdelivery='mail_spool'Step 2. Create and configure DKIM for exim4
After successfully install mail server exim4 you will now need to configure DKIM (DomainKeys Identified Mail). DKIM is an email authentication standard based on domains. It utilizes digital signatures to verify the authenticity and integrity of emails, helping to prevent email spoofing, improve email deliverability, and instill trust in email recipients.

DKIM is an essential component of email authentication systems and is often combined with other standards like SPF and DMARC to enhance email security and trust when configuring a mail server on Linux. To configure DKIM on a Linux mail server, you will need to generate a pair of private and public keys, add the public key to the DKIM record in your domain’s DNS, and verify the DKIM setup.
Open terminal and navigate to exim4 configuration directory:
cd /etc/exim4
sudo mkdir -p /etc/exim4/dkim
openssl genpkey -algorithm RSA -out itsmeit.co.pem -pkeyopt rsa_keygen_bits:2048
openssl rsa -in itsmeit.co.pem -pubout -out itsmeit.co.pub
Explain:
- itsmeit.co.pem is the private key used to configure DKIM_FILE in exim4 on Linux.
- itsmeit.co.pub is the public key used to add the TXT DKIM record in DNS.
Now open the file /etc/exim4/exim4.conf.template and change the values for the following variables to configure the mail server on Linux:
dkim_domain = ${sg{${lc:${domain:$h_from:}}}{^www.}{}}
dkim_selector = itsmeit
dkim_private_key = /etc/exim4/dkim/itsmeit.co.pem
dkim_canon = relaxed
Explain:
- dkim_domain: Specify the domain for which DKIM is applicable. Extract the value from the “From” field in the email header, remove the “www.” prefix (if any), and convert it to lowercase. Enter your domain name directly.
- dkim_selector: Assign a unique name to identify the public key associated with the DKIM private key. This name will be used as the DKIM DNS name for the TXT record (step 3).
- dkim_private_key: Provide the exact path to the DKIM private key file that you created earlier.
- dkim_canon: Determine the method for standardizing the email content before signing the DKIM. In this case, use the “relaxed” method.
Once you have completed configuring the sendmail server by modifying the values of the variables in the “/etc/exim4/exim4.conf.template” file, it is necessary to update and restart Exim to apply the changes immediately.
sudo update-exim4.conf; sudo service exim4 restartStep 3: Create TXT DNS record and configure DKIM record
The DKIM record is a standard for email security that ensures messages remain unaltered during transit between sending and receiving servers. This record utilizes public key cryptography to sign outgoing emails with a private key. To configure a DKIM record and create a DNS TXT record.
In step 2 we instructed you to create the file “itsmeit.co.pub” now open it with the cat command to get the public key.
cat /etc/exim4/yourdomain.com.pub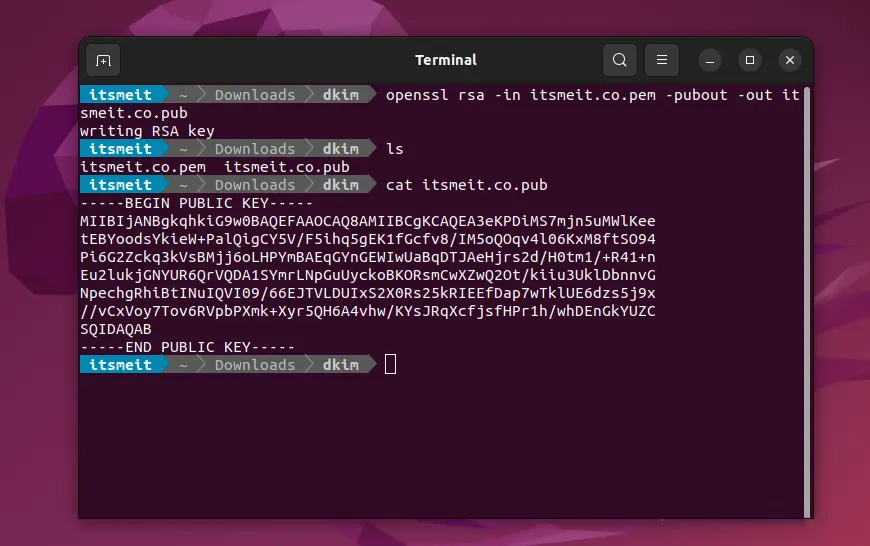
As you can see on the screenshot, the public key starts with “MII” and ends with “QAB”. Now copy this code and edit it in the TXT record below:
v=DKIM1; k=rsa; p=public_key_codeAlso in the previous step 2, in the file exim4.conf.template I have configured “dkim_selector = itsmeit” so the TXT record name will be “itsmeit._domainkey”. Please change and name the correct dkim_selector for the TXT record.

Step 4: Create MX record and configure DNS
Configuring DNS to send mail servers on Linux and MX, SPF, DMARC, DKIM records is the process of setting DNS parameters to ensure successful email sending and receiving, along with authentication and information security. through TXT records in the DNS system.
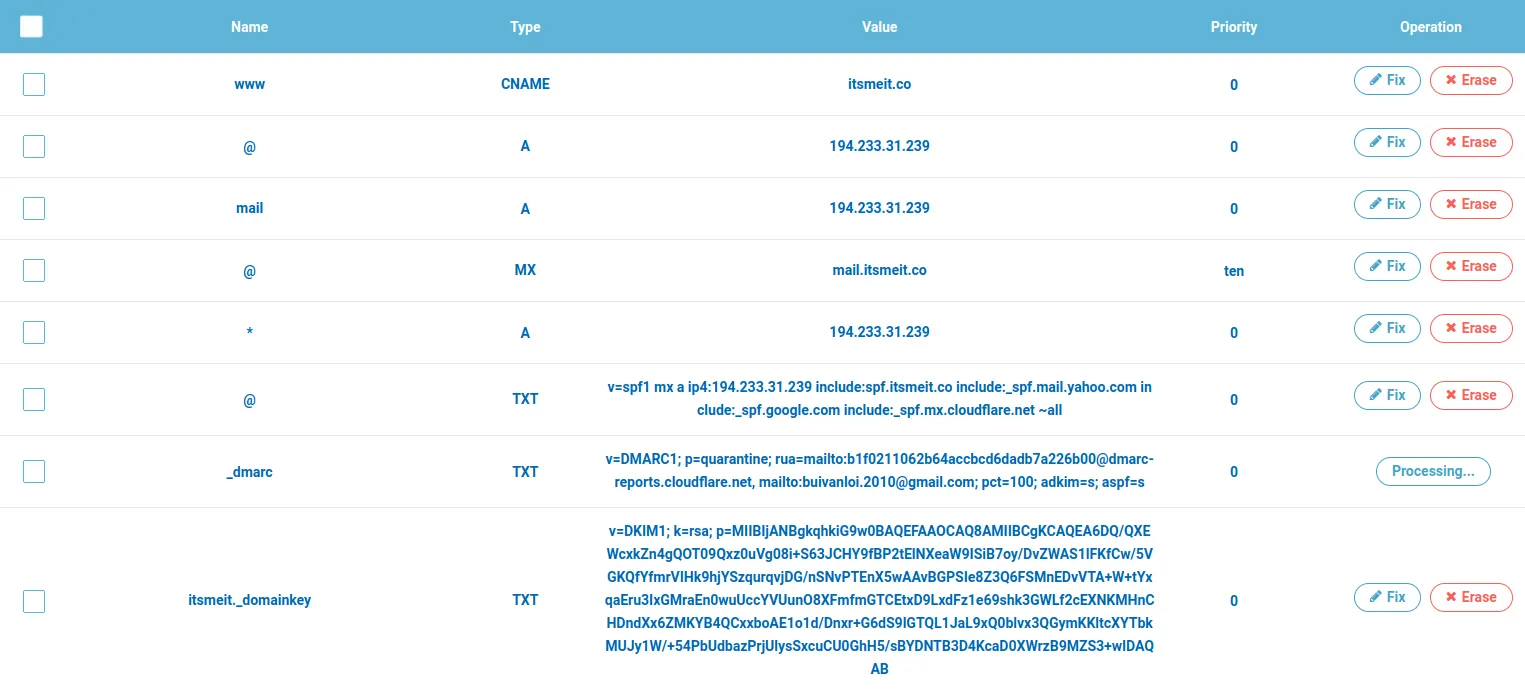
Create an MX (Mail Exchanger) record to specify the mail server you want to use to send and receive email. You need to provide the IP address or domain name of the mail server.
Name | Type | Value               | Priority
 @   | MX   | mail.itsmeit.co     | 10
With this configuration, when someone sends an email to admin@itsmeit.co, the DNS system will use the MX record to identify the mail server mail.itsmeit.co as the email recipient for the domain itsmeit.co.
Step 5. Configure the SPF Record for the Domain
To enhance email deliverability and prevent spoofing, it is crucial to set up the Sender Policy Framework (SPF) record for your domain when configuring a mail server on Ubuntu. SPF is an email authentication method that specifies which mail servers, IP addresses, and domains are authorized to send emails on your domain’s behalf.
To set up an SPF record, log in to your domain DNS management panel and add the following TXT record:
- Name: @ (referring to the domain itself)
- Type: TXT
- Priority: 10
- Value:
v=spf1 ip4:194.233.31.239 include:_spf.google.com include:_spf.mx.cloudflare.net include:_spf.yahoo.com include:icloud.com
include:spf.protection.outlook.com include:amazonses.com include:_spf.yandex.net ~all
This SPF record includes various services like Cloudflare, Google, Yahoo, and others to ensure emails sent from your server to domains of these providers will not be flagged as spam.
To add a new email service, simply append include:spf_record before ~all. Similarly, remove include:spf_record to stop authorizing a service.
Note: Use the SPF Record Analyzer tool to validate your SPF record syntax.
By configuring the SPF record correctly, you help establish email authentication, improve delivery rates, and protect your domain’s reputation for email sending on Ubuntu servers.
Step 6. Configure DMARC to Enhance Email Security
DMARC (Domain-based Message Authentication, Reporting, and Conformance) is a domain-based email authentication standard that plays a crucial role when install mail server on Linux. It combines SPF and DKIM standards for email legitimacy verification and notification of authentication issues. DMARC helps prevent email spoofing, phishing attacks, and spam, while also providing valuable reports to email senders to resolve authentication issues.
Next, create a TXT DMARC record with the name “_dmarc” and the content below.
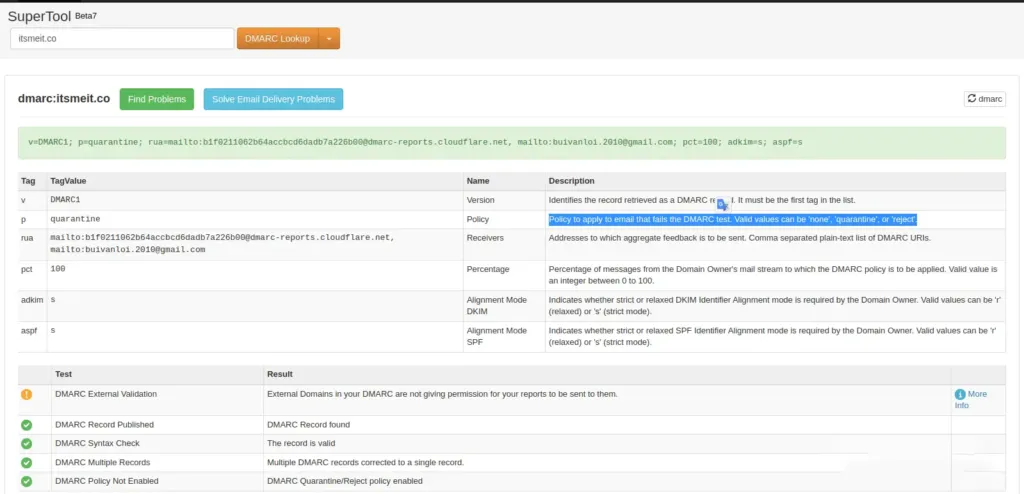
v=DMARC1; p=quarantine; rua=mailto:youmail@gmail.com; pct=100; adkim=s; aspf=sTo better understand and verify whether your DMARC record is correct or not, after adding the DMARC record, you can use the mxtoolbox tool to check. If it’s correct, it should look like the screenshot:
Step 7: Test Sending Emails from the Mail Server
Test sending email on Ubuntu Linux using command (terminal)
To check if the mail server using exim4 is working, in this example, we will use the terminal and run the command with the email account “no-reply@itsmeit.co” to send an email to youmail@gmail.com.
echo "Email body" | mail -s "Email subject" -r "no-reply@yourmail.com" "mail@yourmail.com"
Test sendmail on Linux with PHP code
Create a file named “testmail.php” in the root directory of your website when install mail server on Linux. Use the provided content for the file. Alternatively, you also have the option to execute the testmail.php file directly in the terminal.
<?php
    ini_set( 'display_errors', 1 );
    error_reporting( E_ALL );
    $from = "no-reply@itsmeit.co";
    $to = "youmail@gmail.com";
    $subject = "PHP Mail Test script";
    $message = "This is a test to check the PHP Mail functionality";
    $headers = "From:" . $from;
    mail($to,$subject,$message, $headers);
    echo "Test email sent";
?>
Important: When you install a mail server on Ubuntu/Linux, and configure the relevant DNS records, keep in mind that the authentication process can take anywhere from 3 to 72 hours. Therefore, if you try to send an email and find that your email is classified as spam or cannot be delivered, be patient, and try again once the verification process is complete.