To fully uninstall Docker from Windows 11 and free up your system, you need to remove not only the application but also all leftover components. This guide will help you cleanly remove Docker step by step, ensuring it’s completely gone from your computer.
Uninstall Docker Desktop via Windows Settings
This is the basic step, the same as uninstalling any other software.
- Press Windows + I to open Settings.
- Go to Apps → Installed apps.
- Scroll down and find Docker Desktop.
- Click Uninstall, then confirm.
At this point, Docker Desktop has been uninstalled, but data and configuration files are still on your machine.
Delete leftover configuration files and data
Docker stores data (images, containers, volumes…) and configuration files in hidden folders. If not deleted, they may cause errors when reinstalling later.

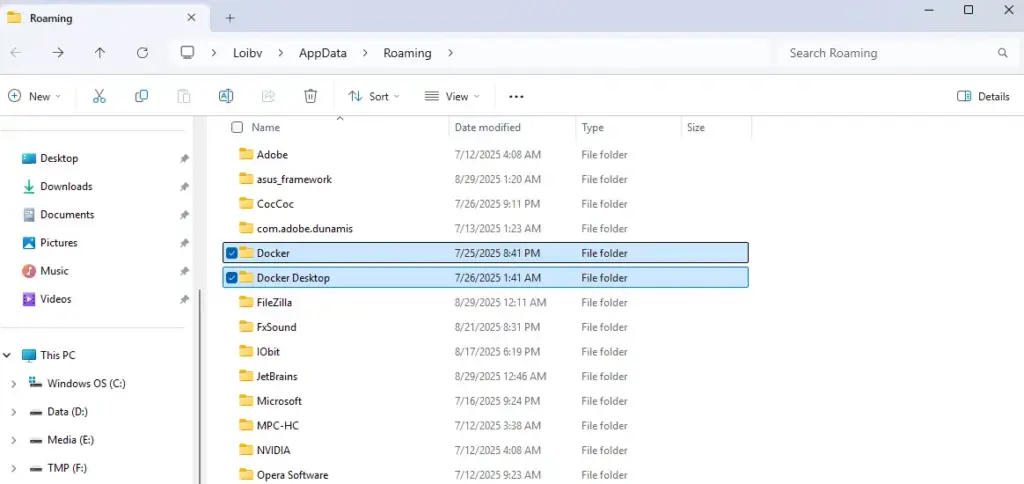
- Open File Explorer (or press Windows + R) and type
%AppData%in the address bar.- Delete all folders related to Docker such as: Docker, RoamingDocker, LocalDocker, LocalDocker Desktop, and .docker.
- Go to
%UserProfile%and delete the .docker folder. - Go to
%ProgramData%and delete the Docker Desktop folder.
📌 Explanation:
%AppData%and%LocalAppData%contain application data.%UserProfile%.dockercontains personal Docker settings.- Deleting all of these ensures no traces of Docker remain on your system.
Remove Docker from WSL (if installed)
Docker Desktop on Windows 11 usually runs based on WSL 2 (Windows Subsystem for Linux).
Step 1: Check if Docker exists
Run the command:
wsl --list --verboseStep 2: Remove Docker
- Open PowerShell as Administrator (Start → type PowerShell → right-click → Run as Administrator).
- Run these commands:
wsl --unregister docker-desktop
wsl --unregister docker-desktop-data
📌 Explanation:
- docker-desktop is the Linux distribution created by Docker to run containers.
- docker-desktop-data stores Docker’s data (images, volumes…).
--unregisterremoves them completely from WSL.
Delete Docker entries from the Registry
If you want a truly clean removal, you can delete leftover entries in the Windows Registry (the system’s configuration database).
How to do it:
- Press Win + R, type
regedit, and press Enter. - Navigate to these paths and delete the “Docker” entries if they exist:
HKEY_LOCAL_MACHINESOFTWAREMicrosoftWindowsCurrentVersionUninstallHKEY_CURRENT_USERSoftwareDocker Desktop
After deleting, restart your computer to refresh the system and completely remove Docker.
To verify Docker is gone:
Open PowerShell and type:
docker --versionIf the system responds that docker is not recognized, it means Docker has been fully removed.
Delete the virtual network created by Docker
Docker Desktop usually creates a virtual network adapter so containers can communicate with the host machine. If not removed, it may cause network conflicts.
How to delete it:
- Open Control Panel (press Win + R, type
control, press Enter). - Go to Network and Sharing Center → Change adapter settings.
- Find the adapter named vEthernet (DockerNAT) or any adapter containing “Docker”.
- Right-click → Delete.
After completing all of the above steps, Docker Desktop will be completely removed from Windows 11:
- No application left
- No data in WSL
- No virtual network adapter
- No hidden configuration files