If you’re planning to run WSL 2, Docker, virtual machines (VMware, VirtualBox), Android emulators, or any app that relies on hardware virtualization, you’ll need to enable VT (Virtualization Technology) in your BIOS. On ASUS machines, this setting is often turned off by default. This guide walks you through how to enable VT for both Intel and AMD CPUs on modern UEFI BIOS systems.
What is VT and Why Do You Need It?
VT (Virtualization Technology) is a hardware feature that allows your CPU to better manage virtual environments. Without it, many apps won’t work properly—or at all. Here are some common use cases that require VT:
- WSL 2 (Windows Subsystem for Linux)
- Docker Desktop
- VMware Workstation / Player
- Oracle VirtualBox
- Android emulators (AVD, Bluestacks, Nox, etc.)
If you’re a dev or tinkerer running anything remotely virtualized, VT is non-negotiable. No VT? You’re pretty much dead in the water.
Step-by-Step: Enable VT in ASUS BIOS
Step 1: Enter BIOS
Option 1 – When your PC is booting up, tap F2 or Del repeatedly to enter the BIOS setup screen.
Option 2 – If you’re already in Windows:
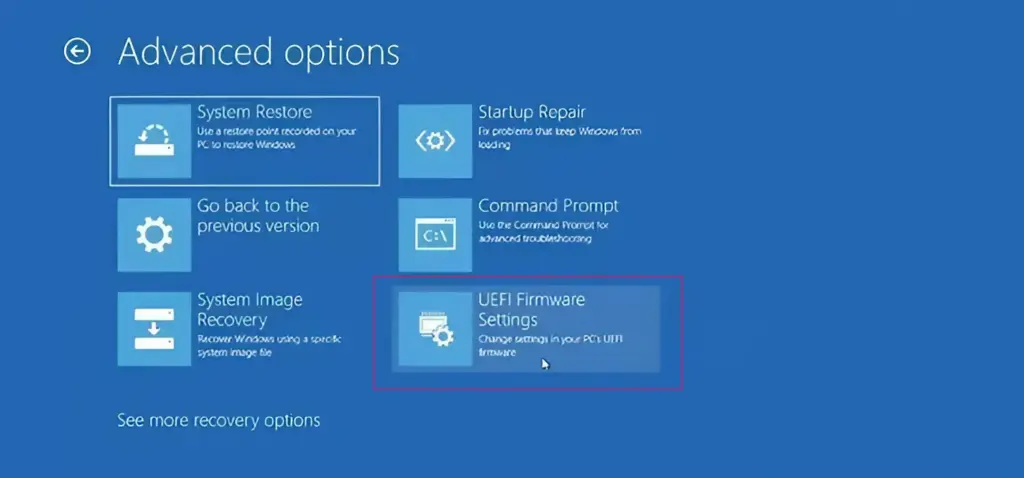
Go to Start > Settings > Update & Security > Recovery > Advanced startup > Restart now
Then choose Troubleshoot > UEFI Firmware Settings > Restart.
Step 2: Switch to Advanced Mode
ASUS BIOS has two views:
- EZ Mode – basic system info only
- Advanced Mode – full access to system settings
To switch to Advanced Mode:
- Press F7, or
- Click the Advanced Mode button in the bottom-right corner of the screen.
Step 3: Enable Virtualization
Once you’re in Advanced Mode:
- Go to the Advanced tab
- Enter CPU Configuration
- Look for the virtualization setting:
- Intel CPUs:
Intel Virtualization Technology→ set to Enabled - AMD CPUs:
SVM ModeorSecure Virtual Machine→ set to Enabled
Pro tip: If you don’t see these options, your BIOS might need a firmware update—or you’re running hardware from the Stone Age.
Step 4: Save and Reboot
- Press F10 to save your changes
- Select Yes or OK to confirm
- Your system will reboot
How to Check if VT Is Enabled
Once you’re back in Windows:
- Open Task Manager (
Ctrl + Shift + Esc) - Go to the Performance tab
- Click CPU
- Look for
Virtualization:on the bottom-right. If it says Enabled, you’re golden.
Heads-Up: What If You Don’t See the VT Option?
There are a few reasons VT might not show up:
- Your CPU doesn’t support it (ancient hardware)
- Your BIOS needs an update (check ASUS Support)
- The setting is hidden or locked down (rare, but happens)
And hey, don’t poke around other BIOS settings unless you know what you’re doing—nuking your boot order or tweaking voltages isn’t the vibe unless you’re down for troubleshooting.
Also, remember: enabling VT in BIOS is just step one. WSL 2 requires additional settings in Windows, including enabling Hyper-V and the Virtual Machine Platform. Don’t skip those or you’ll be chasing your tail later.
FAQ
Q: Does enabling VT affect performance?
A: Nope. VT only kicks in when you’re running a virtualization-based app. Otherwise, it just chills in the background.
Q: Do I need VT for gaming?
A: Not at all. VT has no effect on game performance. That said, some anti-cheat systems flag virtualization tools—so if you’re running into issues, you might need to disable it temporarily.
Q: Is it safe to enable VT?
A: 100%. It’s a standard feature used by millions of devs, testers, and techies every day. Just don’t go flipping random BIOS settings while you’re in there.
Enabling VT on an ASUS PC is a quick and easy process, but it’s essential if you’re doing anything with virtual machines or containerized apps. Whether you’re spinning up a Linux distro via WSL 2, testing apps in Bluestacks, or going full sysadmin mode with Docker, this setting is your launchpad. Get in, flip the switch, and you’re ready to roll.
It’s one of those “set it and forget it” things—like setting up dual monitors or finally ditching Internet Explorer. Once it’s on, you’ll wonder how you ever worked without it.