While using your computer, installing new drivers, modifying the registry, or updating Windows may cause system errors. To reduce risks, Windows provides the System Restore feature. This allows you to create a restore point—a snapshot of the system configuration at a specific time. When issues occur, you can roll back Windows to a previous state without affecting personal data such as documents, photos, or videos.
What is a Restore Point?
A restore point is a snapshot of the system configuration (including registry, drivers, and system files) at a given moment.
Example: If you create a restore point on August 31, 2025, then install a faulty driver, you can restore the system back to August 31, 2025 to return it to a stable state. Personal files (Word, Excel, photos) will remain intact, but any programs or drivers installed after that point will be removed.
Enable System Protection
Before creating restore points, you must enable System Protection.
Steps:
- Press Win + R, type
systempropertiesprotection.exe, and press Enter. - Under Protection Settings, select the Windows drive (usually C:).
- Click Configure…
- Select Turn on system protection.
- Under Max Usage, adjust the slider to allocate storage space (recommended: 3–10% of drive C:).
- Click Apply → OK to finish.
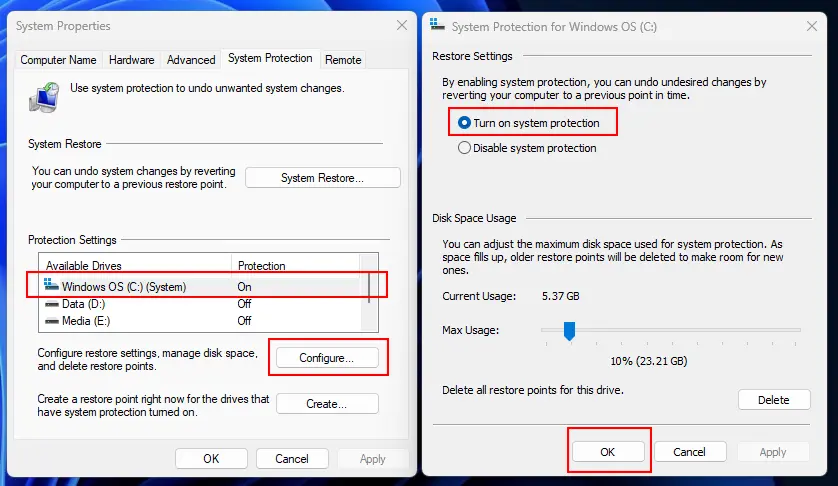
⚠️ If not enabled, Windows cannot save or manage restore points. The more space you allow, the more restore points can be stored; if less, older ones will be overwritten.
Create a Restore Point Manually
It’s recommended to create a restore point manually before making important changes (installing new drivers, system updates, registry tweaks).
Steps:
- Open the System Protection window again (
systempropertiesprotection.exe). - Click Create…
- Enter a clear description, e.g.,
20250831_Before_GPU_driver_install. - Click Create and wait until it completes.
Example: If you are about to install a new graphics driver, create a restore point right before the installation. If the driver causes issues, you can simply restore to the point you created.
Restore When Windows is Still Accessible
If the system still boots normally, you can restore directly within Windows.
Steps:
- Press Win + R, type
rstrui.exe, and press Enter.
(Or go to Control Panel → Recovery → Open System Restore). - Select Choose a different restore point → Next.
- Check Show more restore points to see the full list.
- Select a restore point → click Scan for affected programs to review which apps/drivers will be removed.
- Click Finish → the system will restart and restore automatically.
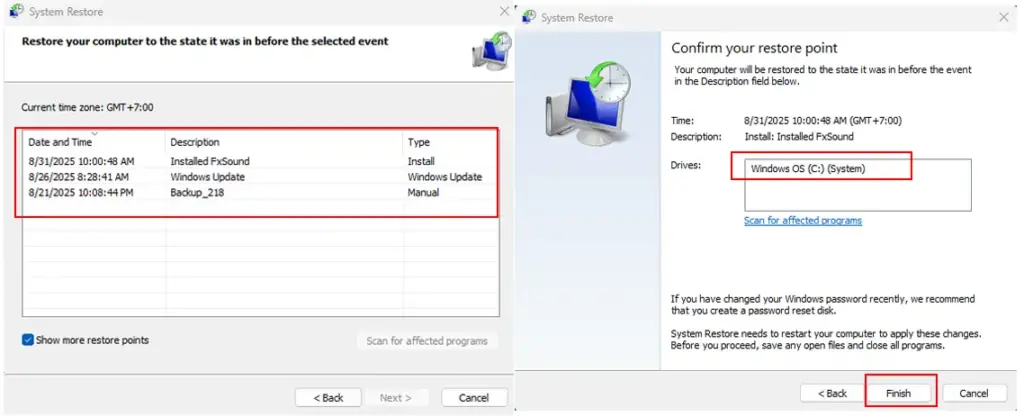
The Scan for affected programs feature is very useful to help you decide whether to use that restore point.
Restore When Windows Fails to Boot (WinRE)
If the system is severely corrupted and cannot reach the desktop, you need to restore via Windows Recovery Environment (WinRE).
⚠️ Note: If your drive is encrypted with BitLocker, you’ll need the BitLocker recovery key.
Steps:
- Boot into WinRE using one of these methods:
- Settings → System → Recovery → Advanced startup → Restart now (if still accessible).
- Automatic entry into WinRE after repeated boot failures.
- Boot from a Windows installation USB.
- From the menu, select Troubleshoot → Advanced options → System Restore.
- Choose your account and enter the password if prompted.
- Select the desired restore point → click Next and follow the instructions.
Manage Restore Points
To view existing restore points, open PowerShell (Admin) and run:
Get-ComputerRestorePointTo change storage size or delete all restore points:
- Go to System Protection → Configure…
- Adjust Max Usage to keep more or fewer restore points.
- Click Delete to remove all restore points for that drive.
👉 You cannot delete individual restore points from the interface.
When to Use System Restore
- After installing new hardware drivers.
- Before a major Windows update (Feature Update).
- When editing the registry or installing system software.
- When encountering unusual errors caused by drivers or system apps.
⚠️ Do not confuse System Restore with data backup. It will not recover deleted personal files. For important data, use File History, OneDrive, or System Image Backup.