Setting up WSL 2, Docker, or a virtual machine but hitting errors because virtualization isn’t enabled? It’s a rookie mistake to skip this step. Checking if your PC has virtualization turned on takes less than a minute—and it’s the make-or-break deal for getting things running smoothly.
What’s Virtualization and Why Check It?
Virtualization (think Intel VT-x or AMD-V) lets software fake out hardware to create virtual OS environments. It’s gotta be enabled in your BIOS/UEFI and recognized by Windows to run stuff like:
- WSL 2 (Windows Subsystem for Linux)
- Hyper-V
- VirtualBox, VMware
- Android Emulator, Docker Desktop…
Problem is, lots of new PCs or laptops ship with it off by default, or tools like CCleaner can accidentally nuke it temporarily.
Check if Virtualization is Enabled/Disabled
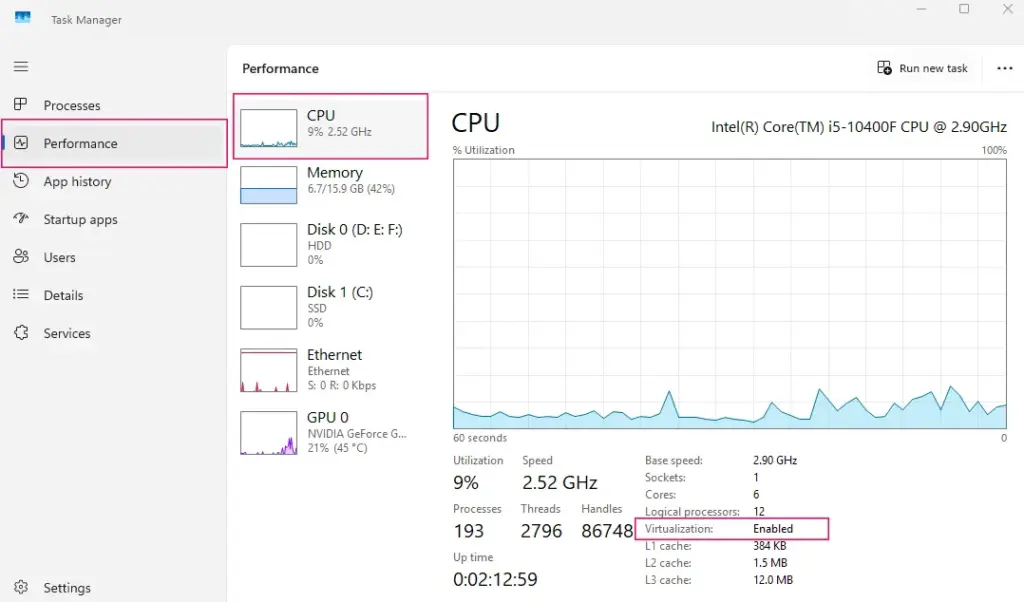
1. Peek at Task Manager
Fastest way to scope it out.
- Hit
Ctrl + Shift + Escto pop open Task Manager - Jump to the Performance tab
- Click CPU, then check the bottom-right corner
📌 Virtualization: Enabled → You’re golden
📌 Disabled → It’s off or blocked in BIOS

Note: No virtualization line? Your rig might not support VT, or the firmware’s locking it down.
2. Run systeminfo in PowerShell
- Fire up PowerShell as Admin
- Type:
systeminfo- Scroll to the bottom, hunt for:
Hyper-V Requirements:
  VM Monitor Mode Extensions: Yes
  Virtualization Enabled In Firmware: Yes
If “Virtualization Enabled In Firmware” says Yes, you’re good. No? It’s off in BIOS.
3. Use System Information (MSINFO32)
- Press Windows + R → type
msinfo32 - Look for: Hyper-V – Virtualization Enabled in Firmware: Yes
Yes → VT’s on, and you’re ready for Hyper-V or WSL 2.
No → Time to dig into BIOS and flip the switch.
4. No Virtualization Line at All?
Common on budget office PCs or stripped-down Windows installs (like Lite ISOs). Could be:
- CPU doesn’t support VT
- Firmware’s locked
- Windows is gimped (e.g., Windows 10 Home doesn’t do Hyper-V)
Common Hiccups & Fixes
| Issue | Why It’s Happening | How to Fix It |
|---|---|---|
| Virtualization: Disabled in Task Manager | VT’s off in BIOS | Reboot, enter BIOS/UEFI → Enable Intel VT-x or AMD-V |
| No “Virtualization” line | Hardware doesn’t support it or Windows isn’t picking it up | Check CPU support with CPU-Z, update BIOS if needed |
| “Virtualization Enabled: No” in systeminfo | Hardware or BIOS-level disable | Manually enable in BIOS |
| WSL 2 won’t run despite VT enabled | Conflicting virtualization apps (e.g., old VirtualBox) | Update apps, enable Hyper-V Platform in Windows Features |
| VT disabled after using optimization tools | CCleaner or Glary Utilities messed with it | Re-check Windows Features, re-enable Hyper-V, or fix Registry |
I once burned two hours chasing a WSL error just because VT got turned off after a BIOS reset. The error was vague as hell, no hints. Since then, checking virtualization is my first move when setting up a new machine or reinstalling Windows. It’s a quick check that saves you a boatload of headaches down the road.
If you need to enable virtualization, the following documents may be helpful:
How to Enable Virtualization Technology (VT) on Dell Computers
How to Enable VT (Virtualization Technology) on HP Desktops and Laptops (Intel & AMD)
How to Enable VT (Virtualization Technology) on ASUS PCs and Laptops
How to Enable VT (Virtualization Technology) on Lenovo PCs (2025 Update)