Virtualization Technology (VT) is required to run tools like WSL 2, Docker, and virtual machines (VMware, VirtualBox, etc.). This guide walks you through enabling VT on Lenovo desktops, ThinkPad laptops, and standard Lenovo motherboards.
Enabling VT helps your machine run better with:
- WSL 2 (Windows Subsystem for Linux)
- Virtual machines (VirtualBox, VMware…)
- Docker Desktop
- Mobile emulators like BlueStacks
Check if Your System Supports VT
Heads-up: Older machines or low-end CPUs might not support VT. If your CPU doesn’t support it, the BIOS won’t show the option either.
To check CPU support:
- Search your processor model on Intel ARK or AMD’s official site.
- Look for “Intel Virtualization Technology (VT-x)” or “AMD-V”.
Quick check in Windows:
- Press
Ctrl + Shift + Escto open Task Manager. - Go to the Performance tab → Click on CPU.
- Look at the Virtualization line:
- Enabled → VT is already turned on.
- Disabled → VT is supported, but not enabled.
- Not visible → Your machine might not support VT, or it’s turned off in BIOS.
This is the quickest way to check if Virtualization is enabled without using any command-line tools.
Enable VT on Lenovo Desktop PCs
Step 1: Enter the BIOS
- Reboot your machine.
- As soon as the Lenovo logo shows up, start spamming
F1orF2(depends on model).
BIOS layout varies across models. Look for virtualization settings under:
Advanced→VirtualizationSystem ConfigurationSecurity→Virtualization
If your BIOS supports search (some modern UEFI ones do), try pressing F9 and search for “virtualization”.
Step 2: Enable Virtualization
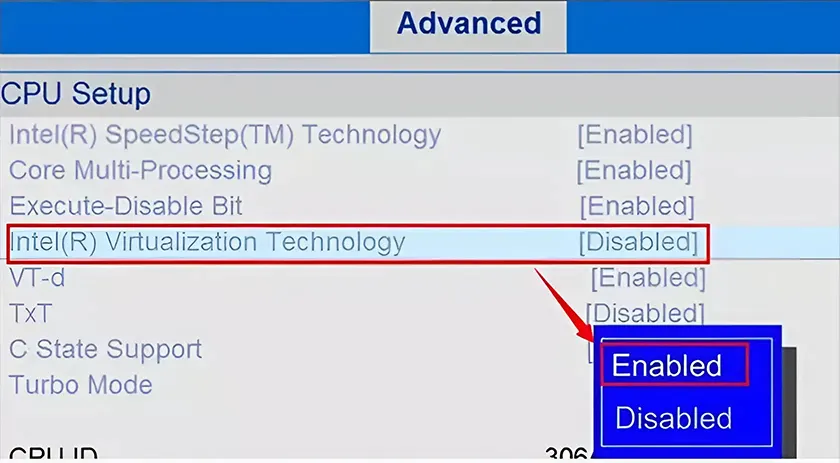
Navigate to: Advanced → CPU Setup → Intel (R) Virtualization Technology and change it from Disabled to Enabled. (like screenshot)
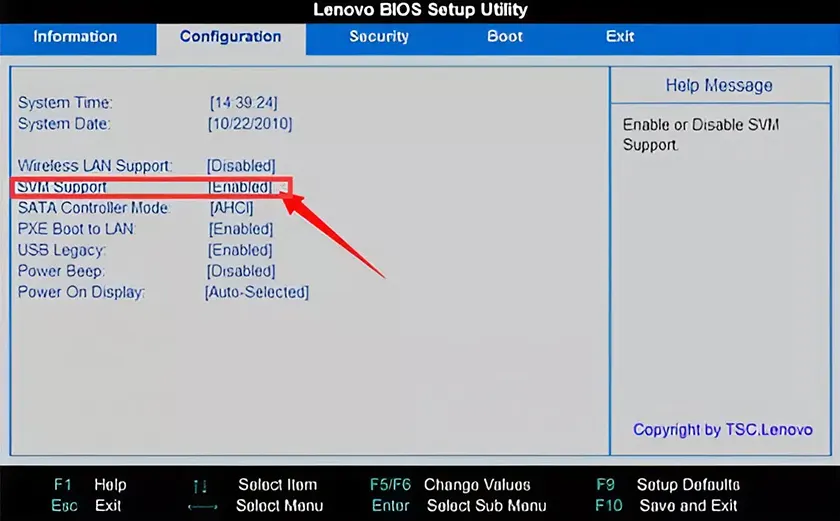
If you’re on an AMD CPU: Go to
Configuration→ SVM Support → Set to Enabled
Step 3: Save & Exit
Press F10 (or Fn + F10 if needed), choose SAVE & EXIT, hit Enter to confirm.
Enable VT on Lenovo ThinkPad Laptops
Tested on models like ThinkPad T14, IdeaPad 5, and ThinkCentre desktops.
Step 1: Enter BIOS
ThinkPad BIOS works slightly differently.
- Reboot your laptop.
- When the Lenovo logo appears, press
Enterto open the Startup Interrupt Menu. - Use
Tabto go to Application Menu, select Setup, then hit Enter.
On newer ThinkPads, virtualization settings might live under:
Config→CPUAdvanced→Virtualization
If you don’t see it, dig through menus or update your BIOS. Some options are buried or hidden behind BIOS versions.
Step 2: Enable Virtualization
In BIOS, go to: Security → Virtualization → Intel (R) Virtualization Technology
Set it to Enabled. Then, press F10 or Fn + F10, save & exit.
Enabling VT is critical for using tools like WSL 2, Docker, or virtual machines. If your CPU supports it, enabling VT takes just a few steps in BIOS. If you don’t see the option, double-check your processor model, update the BIOS, or poke around the menus more thoroughly.
FAQ
1. Why can’t I find the “Virtualization” option in BIOS?
Possible reasons:
- Your CPU doesn’t support VT (no dice).
- The BIOS is too old or hiding advanced settings.
- The UI is a stripped-down version (OEM default).
What to do:
- Look up your CPU on Intel or AMD’s official site.
- Update your BIOS from Lenovo’s support site.
- Try switching to the advanced BIOS view if available.
2. BIOS shows VT enabled, but Windows still says “Disabled”?
You’re probably missing one of these:
- Didn’t enable the correct Intel Virtualization Technology or SVM Support option.
- Windows features are incomplete.
Fix:
- Double-check the BIOS again.
- Go to Windows Features → Enable:
- Virtual Machine Platform
- Windows Hypervisor Platform
3. Still getting errors on WSL 2 or Docker even after enabling VT?
Could be missing base features.
Try:
dism.exe /online /enable-feature /featurename:VirtualMachinePlatform /all /norestartAlso, download and install the WSL 2 kernel manually from Microsoft’s website.
Pro tip: Some overzealous antivirus or security suites can block virtualization. Don’t let them be a buzzkill—check your security software.
4. My PC feels sluggish after turning on VT. Should I turn it off?
VT itself won’t slow your machine. But if you’re actually running heavy-duty VMs or emulators, yeah, your system’s gonna eat up more RAM and CPU.
If you’re not using WSL, Docker, or anything virtual—feel free to turn it off and chill.
5. Anything different with AMD CPUs?
Yeah, slightly.
The option is called SVM Support instead of Intel’s term. Look for it under:
Advanced→CPU Configuration
The rest of the steps? Same deal.
Local IT Culture Bonus
- Borked: If VT’s not working right, we say it’s “borked” (aka messed up).
- Nuking BIOS: When folks reset BIOS or flash it, they often joke they’re “nuking the BIOS.”
- Chicken tax: When you have to update the BIOS, enable VT, install WSL, and troubleshoot Docker—all for one tiny container? That’s the “chicken tax” of dev life.