If you’re building a WordPress site and want to spin up a local dev environment fast, XAMPP’s got your back. It bundles Apache, PHP, and MySQL right out of the box—no need to fiddle with separate installs. Whether you’re testing themes, debugging plugins, or just trying things out before pushing to production, XAMPP lets you run WordPress locally without an internet connection. In this walkthrough, I’ll show you how to get WordPress up and running on XAMPP, plus a few real-world tips and gotchas to save you time.
Step 1: Download and Install XAMPP
1.1 Download XAMPP from the Official Website
Go to Apache Friends and download the XAMPP version that matches your system.
When I first started using XAMPP, I mistakenly downloaded an incompatible version for WordPress, which caused installation errors. Since then, I always check the PHP version beforehand to avoid wasting time on troubleshooting.
Note:
If you’re using the latest version of WordPress, ensure that the PHP version in XAMPP is compatible. WordPress is constantly updated and requires newer PHP versions, so choose XAMPP with at least PHP 7.4 or higher.
If you are running other software like Teams or Docker, check for port conflicts with Apache (typically ports 80 and 443).
1.2 Install XAMPP
Once the download is complete, open the installer file and follow these steps:
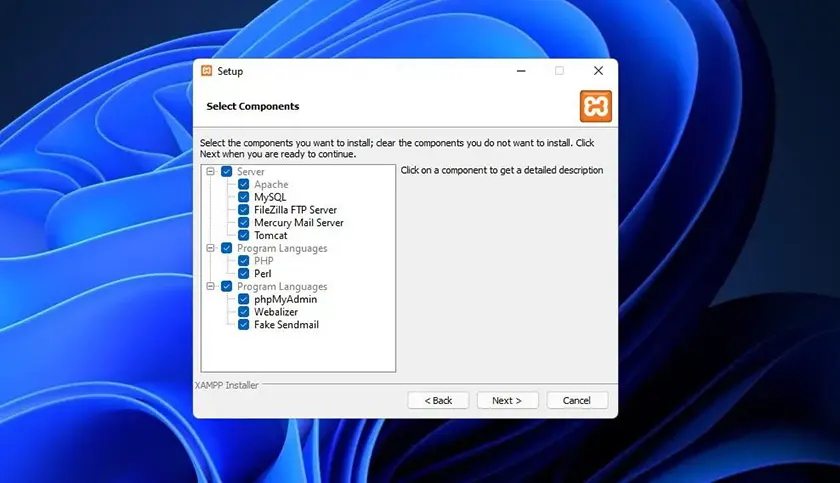
Run xampp-windows-x64-xx.exe and click “Next” until the installation is finished.
When selecting components, you can uncheck FileZilla, Mercury Mail Server, Tomcat, and Perl if you don’t need them.
Choose an installation location: By default, XAMPP installs in C:xampp, but you can select another drive (e.g., D:xampp) to avoid interfering with the operating system.
Step 2: Start XAMPP and Create a Database
2.1 Start Apache and MySQL Services
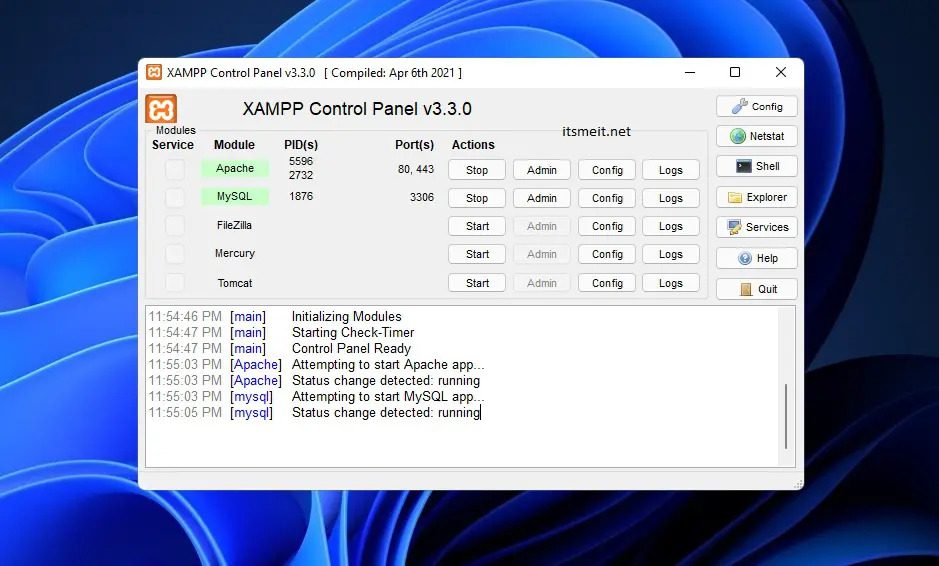
Open XAMPP Control Panel and click “Start” for Apache and MySQL. If Apache fails to start, it might be due to a port conflict. You can resolve this by:
- Opening XAMPP Control Panel, clicking the Config button next to Apache.
- Selecting httpd.conf and locating the line: Listen 80 Change 80 to another port (e.g., 8080).
- Restart Apache.
💡 I once spent an hour troubleshooting why Apache wouldn’t start, only to realize that Teams was using port 80. If you run into errors, double-check if any software is occupying that port!
2.2 Create a Database in phpMyAdmin
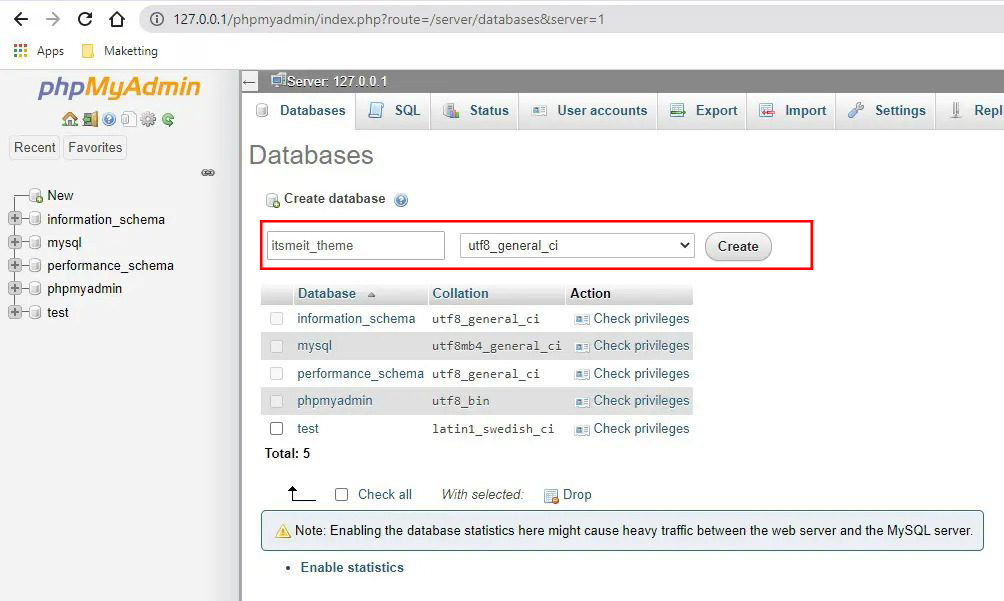
- Open http://127.0.0.1/phpmyadmin.
- Click “New” in the left menu.
- Enter a database name (e.g.,
wordpress_db) and selectutf8mb4_unicode_cias the collation to ensure better support for Vietnamese characters.
Step 3: Download WordPress Source Code
Go to WordPress.org and download the latest version. After downloading:
- Extract the ZIP file.
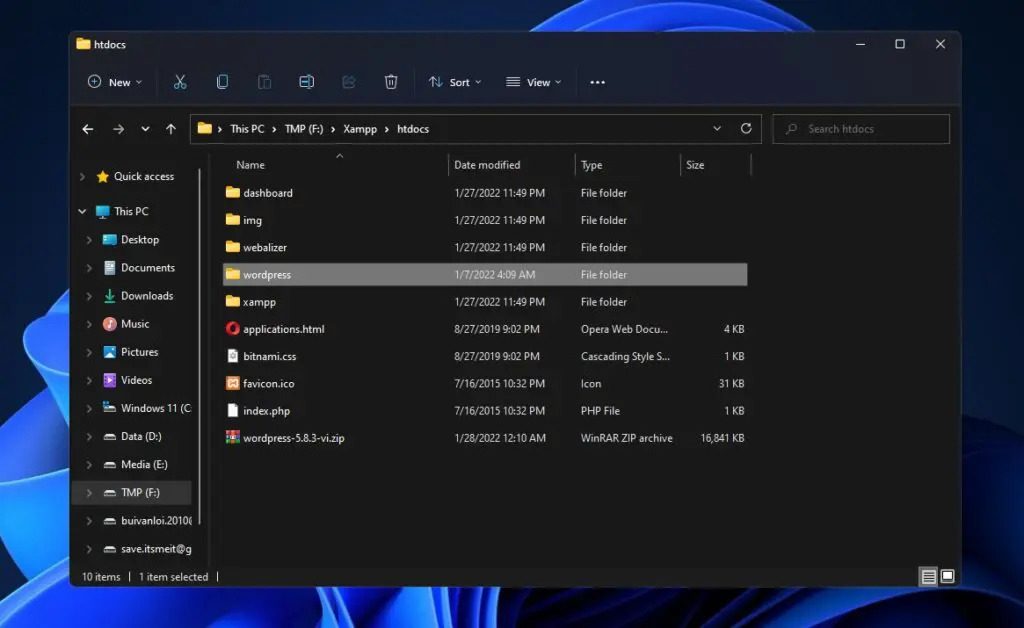
- Copy the wordpress folder into the htdocs directory inside the XAMPP installation folder (C:xampphtdocs).
If you want to use a custom domain, rename the wordpress folder to something else (e.g., mywebsite).
Step 4: Configure Custom Domain in XAMPP
4.1 Set Up a Virtual Host
By default, you can access WordPress via 127.0.0.1/wordpress, but for a more professional setup, configure a custom domain like mywebsite.com.
Open C:xamppapacheconfextrahttpd-vhosts.conf and add the following:
<VirtualHost *:80>
    ServerName mywebsite.com
    ServerAlias mywebsite.com
    DocumentRoot "C:/xampp/htdocs/wordpress"
</VirtualHost>
Open C:WindowsSystem32driversetchosts with Notepad (run as Administrator) and add:
127.0.0.1 mywebsite.com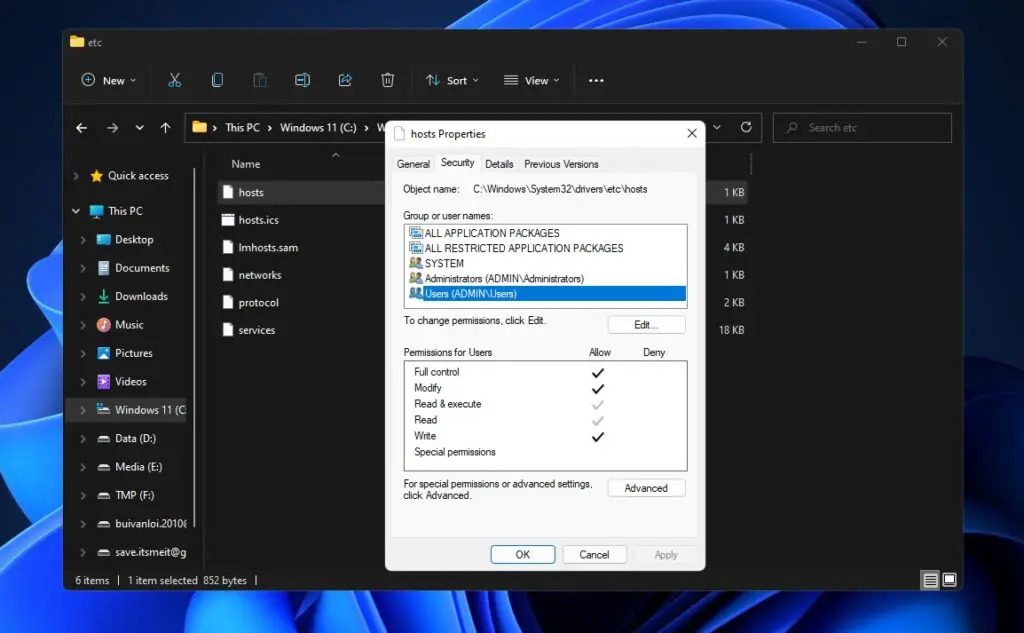
Restart Apache to apply the changes.
Step 5: Install WordPress on XAMPP
5.1 Start the Installation
- Open a browser and visit http://mywebsite.com.
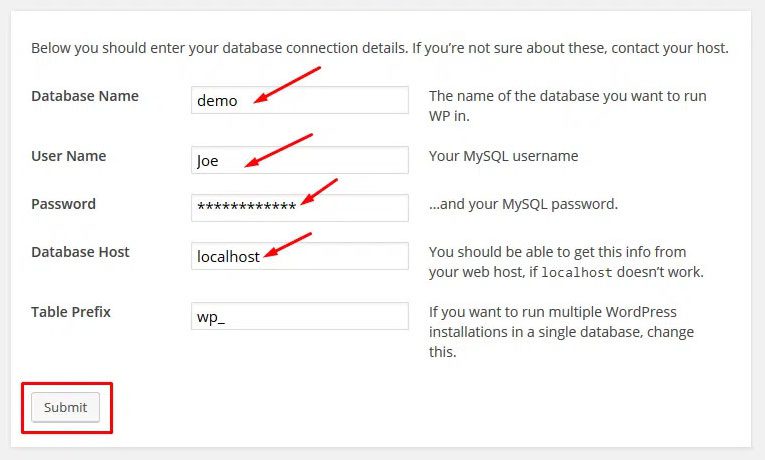
- Select a language and enter the database details:
- Database Name: wordpress_db (created in Step 2).
- MySQL Username: root.
- Password: (leave empty by default).
- Database Host: localhost.
5.2 Configure Admin Account
Enter the required details:
- Site Title: Your website name.
- Username: Create an admin username for WordPress.
- Password: Choose a strong password.
- Admin Email: Used for WordPress notifications.
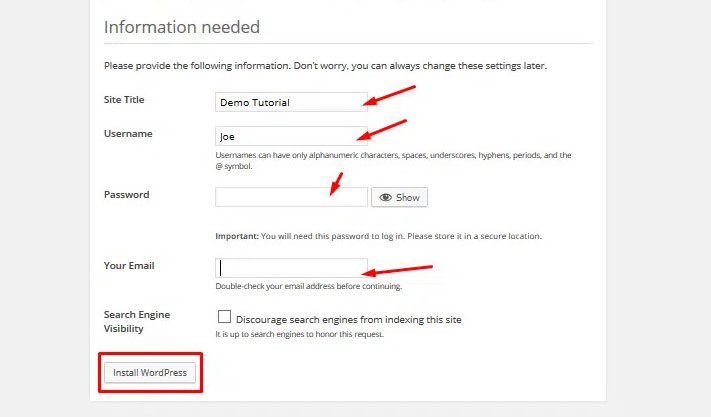
Click “Install WordPress” after filling out the form.
💡 I once forgot my WordPress password right after installation. If you tend to forget passwords like I do, save your credentials immediately or use a password manager!
🛠️ Common Errors and Fixes
1. Apache or MySQL Won’t Start
- First, check for port conflicts (see Step 2.1 for how to change default ports).
- If MySQL fails to start, one common culprit is corrupted
ib_logfile0andib_logfile1—these are InnoDB redo logs that help with crash recovery. - This often happens if MySQL wasn’t shut down properly, like after a system crash or power outage.
Fix:
textCopyEdit1. Go to: C:xamppmysqldata
2. Delete: ib_logfile0 and ib_logfile1
3. Restart XAMPP – MySQL will automatically recreate clean log files.
2. Permission Issues with the hosts File
- Make sure you run Notepad as Administrator before opening and editing: makefileCopyEdit
C:WindowsSystem32driversetchosts
3. Can’t Log Into WordPress (Forgotten Password)
- Use phpMyAdmin to manually reset it:
- Open phpMyAdmin
- Select your database
- Go to
wp_userstable - Click “Edit” on your admin user
- Set a new password and choose MD5 under the “Function” column
💡 Alternative Dev Tools
If XAMPP feels heavy or a bit outdated for your needs, check out these modern alternatives:
| Tool | Why Use It |
|---|---|
| LocalWP | Super beginner-friendly, made just for WordPress |
| Laragon | Lightweight, fast, easy SSL support |
| Docker + WordPress | Ideal for advanced devs or team workflows |
✅ You’re All Set!
Once everything’s installed and configured:
- Admin Panel:
http://mywebsite.com/wp-admin - Frontend:
http://mywebsite.com
Good luck with your WordPress project — and remember, local is always safer than breaking production! 😉