Want to run Ubuntu, Debian, or just about any Linux distro right on Windows 11—without setting up dual boot or dealing with a bloated VM? WSL 2 is your lightweight, fast, and no-nonsense solution—and yes, you can install everything using just the command line.
Requirements
Before diving in, make sure your system checks these boxes:
- OS: Windows 11 build 22000 or higher (official release, not Insider Preview).
- Virtualization support: Your CPU must support virtualization (Intel VT-x or AMD-V), and it needs to be enabled in your BIOS/UEFI.
- Virtual Machine Platform enabled: This system component allows WSL 2 to run a lightweight VM behind the scenes.
- Internet connection: Required to download the Linux kernel and fetch distros from the Microsoft Store or via CLI.
Pro tip: Run Windows Update first to make sure you’ve got the latest patches and features, or you might run into missing components or outdated builds.
Need help enabling virtualization in BIOS? Check these guides:
– Enable VT on ASUS
– Enable VT on HP
– Enable VT on Dell
– Enable VT on Lenovo
Not sure if virtualization is already enabled? You can check it quickly in Task Manager under the “Performance” tab.
See: 🔗 Check if Virtualization is Enabled/Disabled
Step-by-Step Install
WSL 2 is built into Windows 11 by default, so you don’t need to mess with WSL 1 or worry about switching between them.
Quick Install (Default Ubuntu with WSL 2)
If Ubuntu is your go-to, open Command Prompt or PowerShellas admin, and run:
wsl --installThis command will:
- Enable required components like
VirtualMachinePlatformandWindows-Subsystem-Linux - Download the Linux kernel
- Set WSL 2 as the default backend
- Install the default Ubuntu distro
No fuss. No manual toggling.
Install a Different Distro
Want to try something else? In the same admin shell, run:
wsl --list --onlineYou’ll get a list like this:
The following is a list of valid distributions that can be installed.
Install using 'wsl.exe --install <Distro>'.

NAME                            FRIENDLY NAME
Ubuntu                          Ubuntu
Ubuntu-24.04                    Ubuntu 24.04 LTS
Debian                          Debian GNU/Linux
FedoraLinux-42                  Fedora Linux 42
...
To install Fedora Linux, for example, just run:
wsl --install -d FedoraLinux-42This will automatically:
- Download the selected distro
- Set up the Linux kernel
- Set WSL 2 as the default backend
- Walk you through initial user setup
Once done, launch your installed distro from the Start Menu, or with:
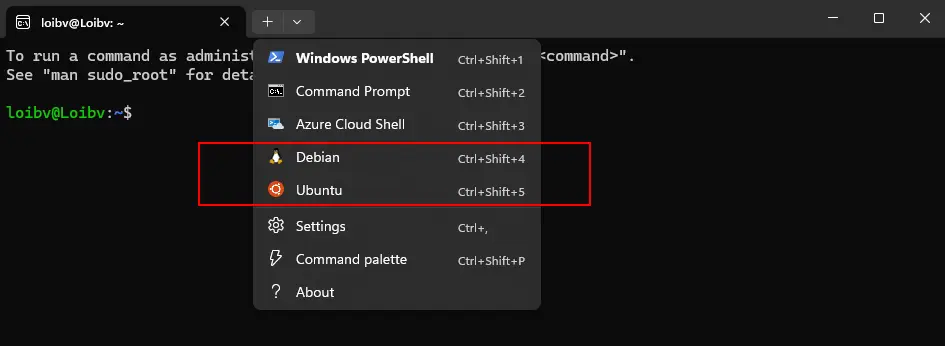
wsl -d <your-distro-name>You can easily switch between distros via dropdown inside the terminal window (like shown in the screenshot below):

In this setup, I’ve got both Debian and Ubuntu installed—switching between them is instant, and honestly, kinda slick. No dual boot. No clunky VMs. Just smooth sailing.
Heads-up:WSL uses the terminal only—there’s no GUI (like Gnome or KDE) out of the box. But honestly? Microsoft did a solid job here letting Linux run this cleanly inside Windows. It’s way more chill than dual boot or VMware/VirtualBox setups.
Fix Linux Installation Issues on WSL 2
Kernel Not Installed
You might see errors like:
WSL 2 requires an update to its kernel component.
Error: 0x80370102
or
Error: 0x800701bc
The WSL 2 kernel is not installed.
How to fix it:
I ran into this the first time I tried to install WSL 2—it was just because I forgot to reboot.
If you’ve already installed the kernel or enabled WSL 2 and VirtualMachinePlatform, just restart your computer and try again. That alone might fix it.
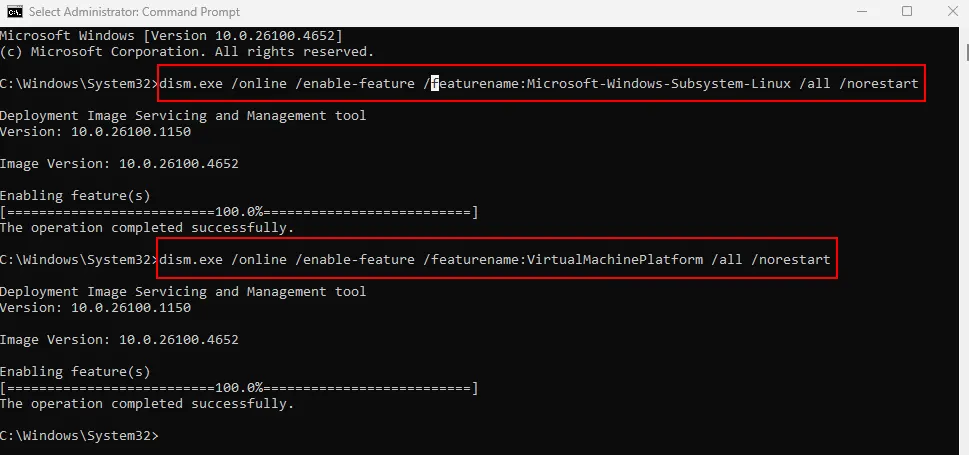
If you haven’t done that part yet, open PowerShell as admin and run:
dism.exe /online /enable-feature /featurename:VirtualMachinePlatform /all /norestart
dism.exe /online /enable-feature /featurename:Microsoft-Windows-Subsystem-Linux /all /norestart
⏳ Don’t skip the reboot after this—WSL 2 won’t kick in until you do.
Stuck on “Installing, this may take a few minutes…”
Usually means virtualization isn’t enabled.
→ Go back to the “Requirements” section and double-check your BIOS/UEFI settings. This one’s easy to overlook, but without VT-x/AMD-V, WSL 2 won’t fly.
The whole process—from checking your system, enabling features, choosing a distro, to getting a working Linux shell—can be done fully through the CLI. As long as you follow the order, you’ll be golden. No need to sweat it, no need to get fancy. Just follow the steps and you’ll have Linux up and running on Windows like a boss.