Do you want your Linux server to send emails via Gmail but don’t know how? This article provides a step-by-step guide to install and configure Sendmail with Gmail SMTP on Ubuntu/Debian, enabling you to send emails securely without requiring DKIM/DMARC authentication.
5 Steps to Set Up Email Sending on Ubuntu Linux
Requirements: Sendmail will use PHP, so your server must have PHP installed. Additionally, you’ll need a Gmail account and an app password to use SMTP.
Step 1: Update the System
Update the system package list to ensure you’re installing the latest versions:
sudo apt-get updateStep 2: Install Sendmail and Dependencies
Next, install the Sendmail mail transfer agent (MTA) along with the necessary utilities to send emails via Gmail SMTP:
sudo apt-get install sendmail mailutils sendmail-cf sasl2-bin libsasl2-modulesExplanation of components:
- sendmail: The core Sendmail software responsible for sending emails on Linux systems.
- mailutils: Tools for sending and receiving emails from the command line and integrating with PHP.
- sendmail-cf: Configuration files to customize Sendmail.
- sasl2-bin and libsasl2-modules: Provide secure authentication mechanisms to connect to Gmail SMTP.
Step 3: Configure Gmail SMTP for Sendmail
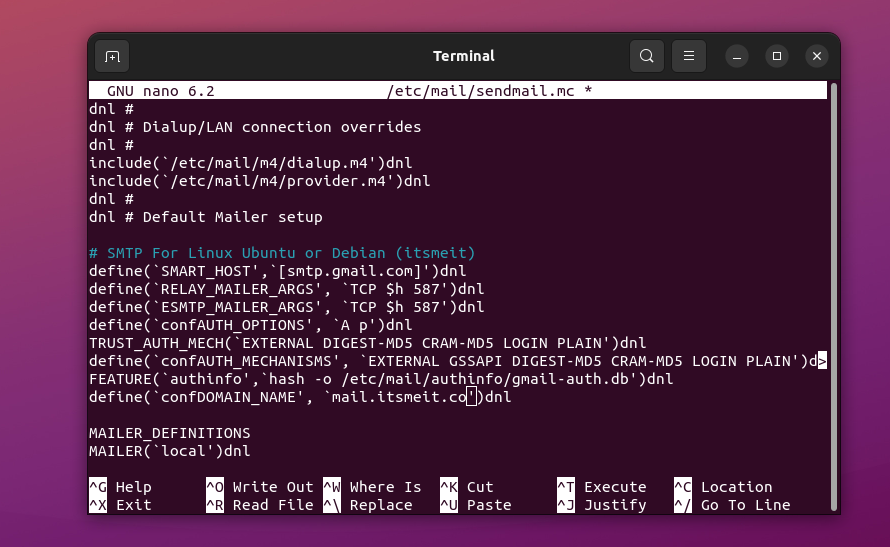
To configure Gmail SMTP, edit the sendmail.mc file as follows:
sudo nano /etc/mail/sendmail.mcAdd the following lines before the MAILER_DEFINITIONS section:
# SMTP For Linux Ubuntu or Debian (itsmeit)
define(`SMART_HOST',`[smtp.gmail.com]')dnl
define(`RELAY_MAILER_ARGS', `TCP $h 587')dnl
define(`ESMTP_MAILER_ARGS', `TCP $h 587')dnl
define(`confAUTH_OPTIONS', `A p')dnl
TRUST_AUTH_MECH(`EXTERNAL DIGEST-MD5 CRAM-MD5 LOGIN PLAIN')dnl
define(`confAUTH_MECHANISMS', `EXTERNAL GSSAPI DIGEST-MD5 CRAM-MD5 LOGIN PLAIN')dnl
FEATURE(`authinfo',`hash -o /etc/mail/authinfo/gmail-auth.db')dnl
define(`confDOMAIN_NAME', `mail.yourdomain.com')dnl
Note:
- Ensure that the
smtp.gmail.comconfiguration is correctly set to use Gmail SMTP. - Replace
confDOMAIN_NAMEwith your actual domain name. - If you want to send mail from the localhost, add the mail domain of
confDOMAIN_NAMEto the/etc/hostsfile, as shown in the screenshot below.

Step 4: Configure Gmail Credentials
1. Create an authentication file:
To use Gmail SMTP with Sendmail, create an app password from your Gmail account. This password provides secure authentication for third-party applications. Refer to this guide for creating an app password.
Run the following commands to create and configure the Gmail authentication file:
sudo -s
mkdir -m 700 /etc/mail/authinfo
touch /etc/mail/authinfo/gmail-auth.db
chmod 600 /etc/mail/authinfo/gmail-auth.db
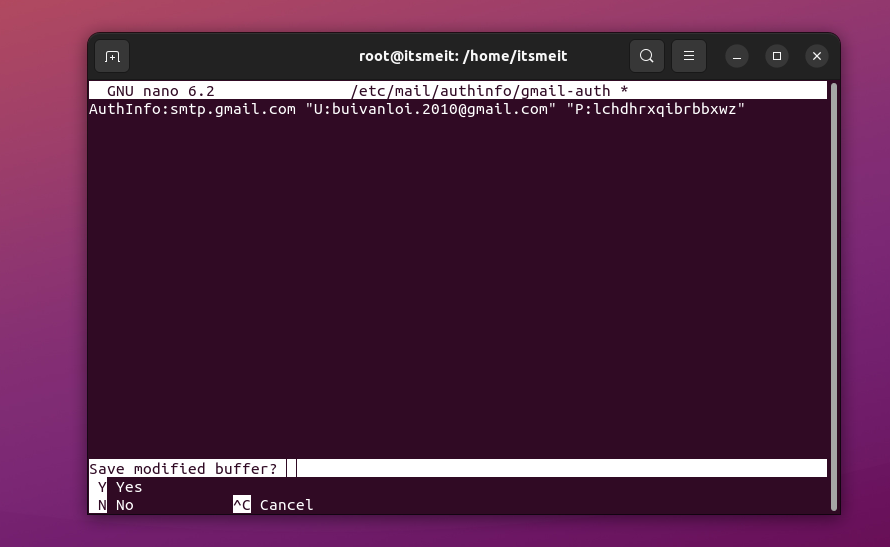
Edit the file gmail-auth and add your Gmail credentials as follows:
sudo nano /etc/mail/authinfo/gmail-authGo ahead and edit the account name and app password as in the code snippet below and add it to the gmail-auth file.
AuthInfo:smtp.gmail.com "U:buivanloi.2010@gmail.com" "P:16-digit-app-password"
2. Generate a hashed database file:
Run this command to create an encrypted database file (gmail-auth.db) that Sendmail can use for secure authentication:
sudo makemap hash /etc/mail/authinfo/gmail-auth.db < /etc/mail/authinfo/gmail-authApply the configuration changes by restarting the sendmail service:
sudo systemctl restart sendmailStep 5: Test Email Sending
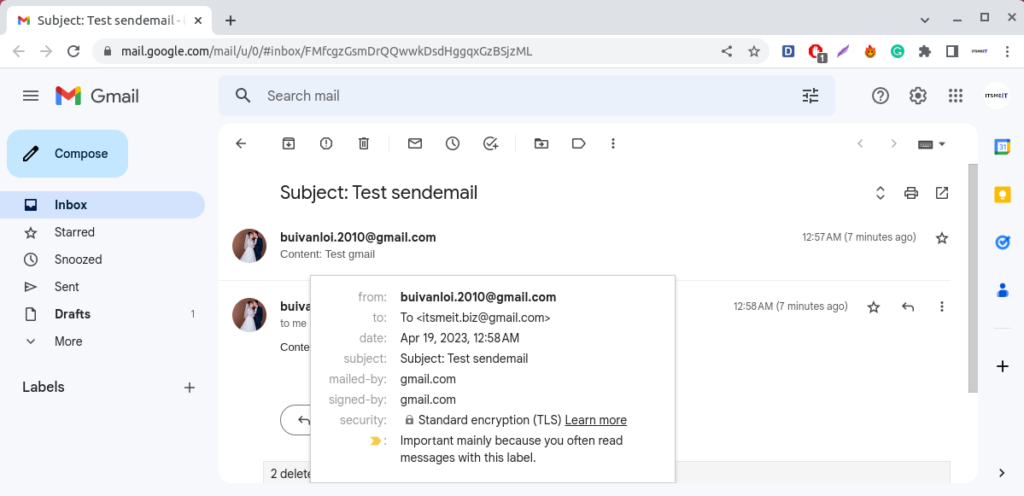
To test email functionality, you can trigger email notifications from your website for actions like order confirmation, password reset, or newsletter subscription.
Alternatively, use the following command to send a test email from the terminal:
echo "Content: Test Gmail" | mail -s "Subject: Test Sendmail" -a "From: your@gmail.com" -a "To: To <your@gmail.com>" your@gmail.comReplace your@email.com with your actual email address.

FAQ: Common Sendmail Errors
Configuration Issues with Sendmail
If you’ve made too many changes or accidentally corrupted the main configuration file /etc/mail, reset it to default using: sudo sendmailconfig and answer Y (Yes) to all prompts to reapply default settings.
‘Authentication failed’ Error with Gmail SMTP
The ‘gmail-auth’ file in (Step 4) is misconfigured with incorrect Gmail account information or app password. Your account must have two-factor authentication (2FA) enabled, and you need to create and use a separate app password instead of your regular Gmail username and password.
‘Message queued but not sent’ Error
Ensure that the Sendmail service is running: sudo systemctl status sendmail. If the status is not active (running), check the Sendmail logs at ‘/var/log/mail.log’ and troubleshoot based on the log details.
Emails Stuck in Queue
Run the following command to check the total number of emails in the queue: sendmail -bp. If necessary, you can clear them, as too many queued emails may slow down the sending process: sudo postsuper -d ALL
‘TLS Handshake Failed’ Error
This error typically occurs when the SSL/TLS secure connection to the SMTP server fails. Possible causes include an invalid or expired SSL/TLS certificate or incompatibility between PHP and OpenSSL configurations. To resolve this, enable OpenSSL in PHP, update to the latest version of SSL/TLS, ensure the SSL certificate is valid, and configure the correct port (587 for TLS, 465 for SSL).
‘Rate Limit Exceeded Error
The ‘Rate Limit Exceeded’ error occurs when you exceed the daily email sending limit set by Gmail. To resolve this, reduce the number of emails sent or use Google Workspace to increase the limit.