Backing up data on a Linux server or VPS is a crucial step to safeguard and restore your databases in case of unexpected issues. In this article, we’ll guide you through setting up automatic MySQL backups daily, weekly, and monthly using a simple, efficient bash script—no need for cPanel or complicated software.

The Importance of Automatic Database Backups
Automatic database backups are essential for protecting your data and ensuring the stability of your system. Here are the key benefits:
- Data Protection Against Risks: Prevent data loss due to hardware failures, operating system errors, or accidental actions. Backups ensure quick recovery.
- Defend Against Cyberattacks: If your website is attacked by viruses or injected with malicious links, automatic backups enable fast recovery, minimizing damage.
- Time-Saving Automation: Eliminate the risk of forgetting to back up, reduce manual work, and focus on more critical tasks.
Features of the SQL Backup Bash Script
This bash script is designed to automate MySQL backups on Linux (Ubuntu/Debian) and includes the following key features:
- Backup: Create daily, weekly, and monthly backups of all databases.
- Backup Management: Store backups in separate directories:
daily,weekly, andmonthly. - Logging: Log the backup process for easy monitoring of actions and data.
- Email Reports: Automatically send reports with attached SQL backup files via email.
How to Use the MySQL Backup Tool on Linux
Requirements:
- Sudo or Root Privileges: Required to run the script.
- Cronjob: Ensure your server has cron enabled.
- Mail Service: A mail service (e.g., exim, sendmail, or postfix) must be installed if you want to send email reports.
- Mutt Utility: To send emails with attachments, install the
muttutility (optional).
sudo apt install mutt Installation Steps:
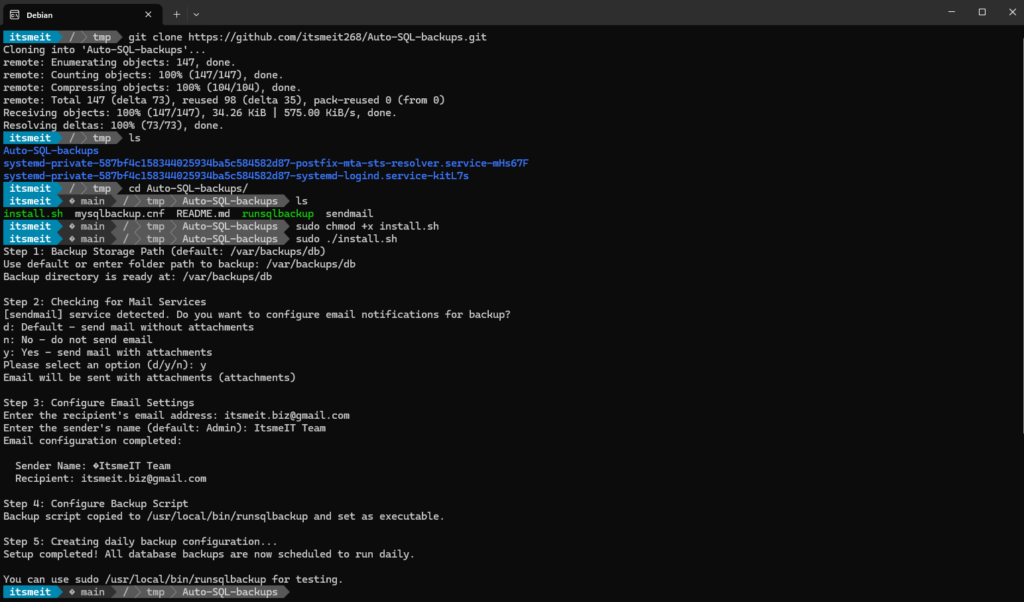
- Download the Auto-SQL-backups Tool: https://github.com/itsmeit268/Auto-SQL-backups
- Access Your Server: Log in to the server via SSH and use GIT to clone the repository or download and extract the ZIP file.
- Navigate to the Directory:
cd Auto-SQL-backups - Set Execute Permissions for the Installer:
sudo chmod +x install.sh - Run the Installation Command:
sudo ./install.sh - Follow On-Screen Instructions: Complete the setup process in the terminal.

Testing the Script:
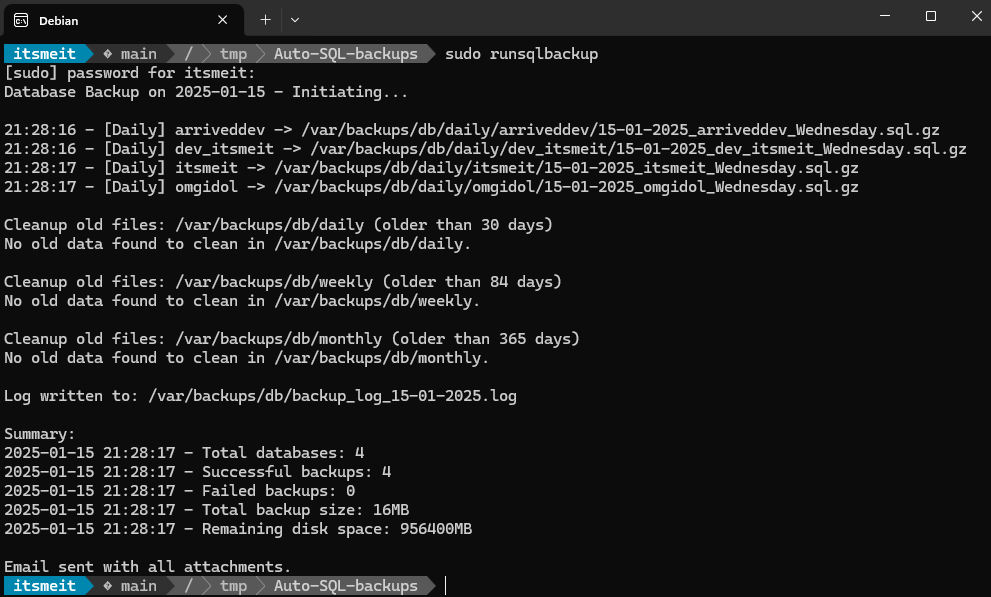
After installation, test the script with the following command:
sudo runsqlbackup
Alternatively, you can run:
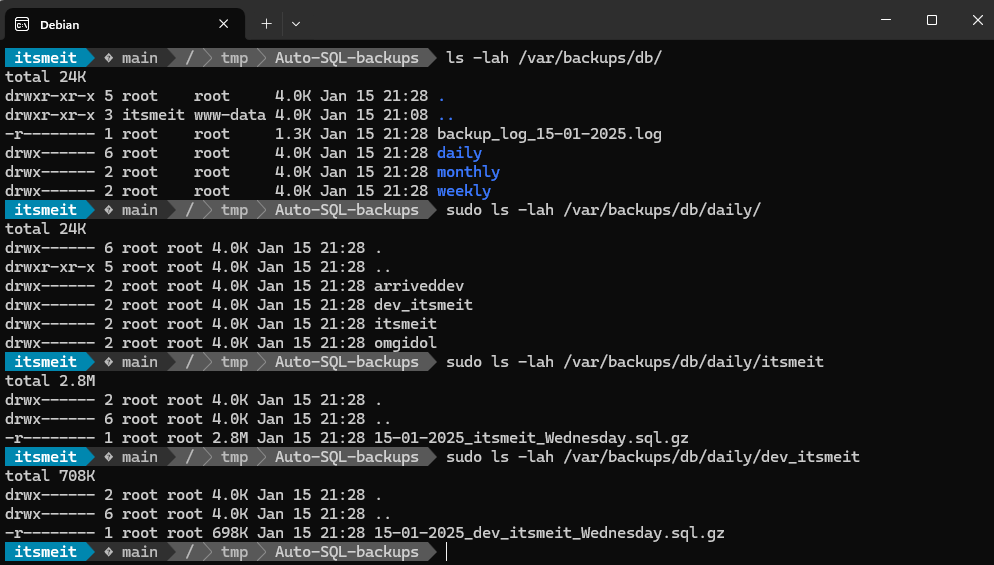
sudo /etc/cron.daily/runsqlbackupThe result will be SQL files stored in daily, weekly, and monthly directories. From now on, all your databases will be automatically backed up daily, weekly, and monthly without any manual intervention.
Verify the Backup Files:
Check the backup files in the respective directories to ensure the process is running correctly.

Fixing Common Issues in Automatic SQL Backups
- Error: “Permission denied”
- Cause: You don’t have the necessary permissions to create directories or files.
- Solution: Run the
install.shfile with root or sudo privileges. Example:sudo ./install.sh
- Error: “Invalid directory”
- Cause: The directory specified for saving backup files is incorrect or does not exist.
- Solution: Ensure you specify the correct directory and that it exists.
- Error: “The server has no mail service”
- Cause: The server does not have a mail service installed.
- Solution: Install a mail service such as exim, sendmail SMTP, or postfix.
If you don’t need email notifications, you can ignore this warning.
- Error: “Email does not attach files”
- Cause: Missing tools to send emails with attachments.
- Solution: Install the
muttutility or ensure that the mail service supports the-Aoption for sending emails with attachments. Example:sudo apt install mutt
Setting up automatic MySQL backups on a Linux server not only minimizes the risk of data loss and saves time but also ensures system recovery in case of any issues. All of this is achieved using a simple and effective bash script, without relying on complex tools or expensive software.