For Ubuntu users, the Terminal is an indispensable tool for performing important tasks. However, its default interface can look a bit dull. Here’s how to customize fonts, colors, and other features to make your Terminal more attractive and distinctive.
Why Customize the Ubuntu Terminal?
Customizing the Terminal makes the interface more visually appealing, displays information clearly (Git status, time, path), provides inspiration, and supports synchronization across multiple tools such as Bash, Zsh, Tmux, and Vim/Neovim. The configuration is simple and easy to implement, even for beginners.
How to Install and Customize the Terminal with Powerline
Powerline is a tool that helps display useful information (such as Git status, time, path) directly on the Terminal, while providing a beautiful interface for Bash, Zsh, Tmux, and Vim. If you prefer simplicity and ease of use, Powerline is a great choice compared to Oh My Zsh.
Step 1. Add the Powerline repository
Note: Ubuntu 22.04 or later or Debian 12 has Universe enabled by default, you can skip this step.
Open the Terminal and run the following command to add the universe repository:
sudo add-apt-repository universe
sudo apt update
Step 2. Install the Powerline tool
sudo apt install powerline -yStep 3. Configure Powerline
Custom configurations for “bash shell” will be saved in the .bashrc file. To add the Powerline configuration, copy the code below and run it on the Terminal. This configuration will be added to the end of the ~/.bashrc file:
echo '# Powerline configuration
if [ -f /usr/share/powerline/bindings/bash/powerline.sh ]; then
  powerline-daemon -q
  POWERLINE_BASH_CONTINUATION=1
  POWERLINE_BASH_SELECT=1
  source /usr/share/powerline/bindings/bash/powerline.sh
fi' >> ~/.bashrc
Note: The ~/.bashrc file corresponds to the path /home/$USER/.bashrc, so this configuration only applies to the current user. If you want to customize the Terminal for the root user as well, you can switch to root using the command sudo -s and execute the same echo command.
Finally, to apply the configuration changes, run the following command:
source ~/.bashrcStep 4. Configure the terminal font
Fonts and icons are important factors in beautifying the Terminal. You can refer to the source document at: https://github.com/powerline/fonts. There are many font styles to choose from. In this article, I choose the LiberationMono font set for its simplicity and readability.
1. Install the wget tool (if not already):
sudo apt install wget2. Create a custom font directory:
mkdir -p ~/.fonts3. Download the LiberationMono font set:
Copy and run the following commands in turn to download 4 variants of the LiberationMono font to the ~/.fonts directory:
wget https://github.com/powerline/fonts/raw/master/LiberationMono/Literation%20Mono%20Powerline.ttf -O ~/.fonts/Liberation Mono Powerline.ttf
wget https://github.com/powerline/fonts/raw/master/LiberationMono/Literation%20Mono%20Powerline%20Bold.ttf -O ~/.fonts/Liberation Mono Powerline Bold.ttf
wget https://github.com/powerline/fonts/raw/master/LiberationMono/Literation%20Mono%20Powerline%20Italic.ttf -O ~/.fonts/Liberation Mono Powerline Italic.ttf
wget https://github.com/powerline/fonts/raw/master/LiberationMono/Literation%20Mono%20Powerline%20Bold%20Italic.ttf -O ~/.fonts/Liberation Mono Powerline Bold Italic.ttf
Note: You can experiment and change the path to download other fonts from Powerline according to your preferences.
4. Apply the new font:
After downloading, run the following command to refresh the font cache:
fc-cache -vf ~/.fonts5. Restart the Terminal:
Close and reopen the Terminal to apply the changes. You will see a significantly improved new interface with Powerline fonts and icons.
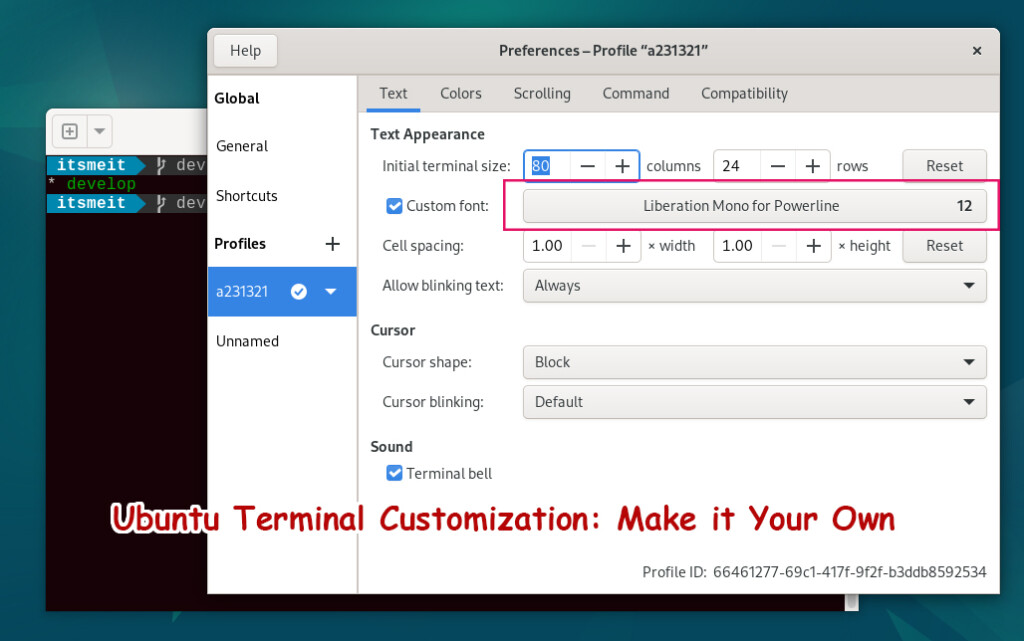
6. Customize the font for terminals using GNOME
Choose a font with “for Powerline” in the list (e.g. LiberationMono, MesloLGS NF, Hack).
- Open the terminal and select Preferences.
- Select the Profile you want to edit.
- Go to the Text tab, check Custom Font.

Common Issues and Fixes When Using Powerline
When customizing Powerline, you may encounter the following errors. Here’s how to fix them:
1. Powerline icons are not displayed correctly
Cause: The font does not support Powerline icons.
Solution:
- Make sure you have installed and applied a font with the words “for Powerline” (e.g. MesloLGS NF, Hack).
- Run the following command to refresh the font cache:
fc-cache -vf ~/.fonts - Close and reopen the Terminal.
2. Powerline does not run or does not display
Cause: Configuration is missing or not applied.
Solution:
- Check if the configuration file ~/.bashrc has the Powerline configuration added.
- Make sure powerline is running, try restarting with the command:
powerline-daemon --replace
powerline-daemon --replace3. Colors are not displayed correctly
Cause: The terminal does not support 256 colors or color mode is not enabled.
Solution:
- On the Terminal interface, open Preferences > Profile > Text > Colors and select Use 256 colors.
- Or run the command to add the color configuration:
export TERM="xterm-256color"Customizing the Ubuntu Terminal with Powerline is a simple and effective way to enhance your work experience. Have you tried this? Please share your experience or tips in the comments section!