You need to create a USB boot to install Windows 10, 11 for a UEFI or Legacy computer but don’t know how? This article will help you do it easily, even with low-configuration computers.

Creating a bootable USB with Rufus is a popular solution with many powerful advantages:
- The creation process is simple, highly compatible on all devices.
- Move easily to install Windows on many different PCs/laptops.
- Minimize errors during Windows installation.
In addition to installing Windows, USB boot also helps rescue data, fix drive and system errors, partition hard drives and safely crack passwords.
Note before creating a USB boot to install Windows
To create a bootable USB to install Windows 10 with Rufus, you need to prepare:
- A USB drive with a capacity of 8GB or more, formatted and supporting UEFI.
- The Windows 10 ISO installer.
Steps to create bootable USB install Windows 10/11
- Connect the USB drive to your computer or laptop.
- Download the Rufus USB Boot Creation Tool.
- After downloading Rufus, right-click and run with Admin rights and click Next until Finish.
- Open Rufus and start creating a USB to install Windows.
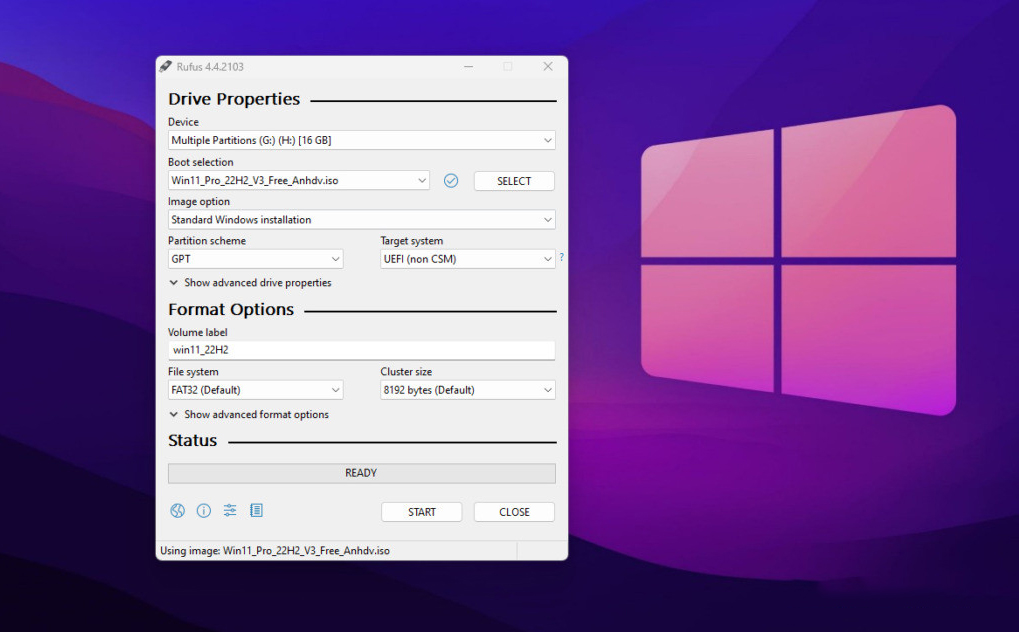
- Click Select and find the downloaded ISO file.
- Rufus will automatically detect the USB device. If you have multiple external storage devices connected, you can select your USB device from the Device section.
- In the Partition scheme section, if your computer uses a GPT partition, select GPT and Target system select UEFI (non-CSM). If not, select the MBR that corresponds to your hard drive partition.
- Check the information again and click “Start” for Rufus to create a USB Boot (refer to the screenshot).

Note: Rufus will ask you to confirm the USB format before proceeding to create a boot. Click “OK” to agree to format the USB because this process will erase all data on the USB. Therefore, make sure you have backed up any important data on the USB before performing this step.


