Setting up WordPress on Ubuntu 24.04 (or 22.04) with Nginx, MariaDB, and PHP 8.2 provides a lightweight, high-performance LEMP stack for running modern websites.
Prerequisites
This guide focuses on installing WordPress, but before we begin, ensure you have the following:
✅ A Linux system (Ubuntu or any other Linux distribution)
✅ Root access or a user with sudo privileges
✅ A stable internet connection to download the required packages
✅ A working LEMP stack — make sure the following components are properly installed and configured:
– Nginx
– PHP (8.2 or later)
– MariaDB
If you’re ready, let’s proceed with the installation!
Steps to Install WordPress
Step 1: Download and Prepare WordPress Source Code
The way we structure directories will be beneficial if you manage multiple projects in the future. The basic idea is simple: place the source code inside a specific directory.
Use the following commands to download and extract WordPress directly via terminal:
First, install wget, a tool used to download files from the internet:
sudo apt install wgetNext, create a directory for your WordPress site. Replace yourdomain.com with your actual domain name:
sudo mkdir -p /var/www/vhosts/yourdomain.com/Move into the newly created directory:
cd /var/www/vhosts/yourdomain.com/Download the latest WordPress package from the official WordPress website:
sudo wget https://wordpress.org/latest.tar.gzExtract the package directly into the current directory. The option --strip-components=1 removes the top-level “wordpress” folder so that the files are placed neatly inside the chosen directory:
sudo tar -xvzf latest.tar.gz --strip-components=1Finally, delete the compressed package to save disk space:
sudo rm latest.tar.gzThis set of commands downloads the WordPress source and extracts it directly into the yourdomain.com directory, removing the extra wordpress/ folder.
💡 Note: If you’re using a graphical interface (GUI), you can also download the source manually from the official website, extract it, and move it into your project directory:
🔗 Download WordPress
At this point, your WordPress files are ready for the next step.
Step 2: Configure Nginx for WordPress
Create an Nginx Configuration File
Nginx requires a dedicated configuration file for your WordPress website. Create and edit the file using:
sudo nano /etc/nginx/sites-available/yourdomain.com.confNow, add the following configuration:
server {
    listen 80;
    listen [::]:80;
    server_name yourdomain.com www.yourdomain.com;

    return 301 https://yourdomain.com$request_uri;
}

server {
    listen 443;
    listen [::]:443;

    server_name yourdomain.com www.yourdomain.com;

    #ssl_certificate /etc/letsencrypt/live/itsmeit.co/fullchain.pem;
    #ssl_certificate_key /etc/letsencrypt/live/itsmeit.co/privkey.pem;

    # Path to document root
    root /var/www/vhosts/yourdomain.com/;

    # File to be used as index
    index index.php index.html;

    # Overrides logs defined in nginx.conf, allows per site logs.
    access_log  /var/log/nginx/yourdomain.com.vhost.log;
    error_log   /var/log/nginx/yourdomain.com.vhost.err;

    location ~ .php$ {
        try_files $uri /index.php =404;
        fastcgi_pass unix:/run/php/php8.2-fpm.sock;
        fastcgi_index index.php;
        fastcgi_param SCRIPT_FILENAME $document_root$fastcgi_script_name;
        include fastcgi_params;
        fastcgi_read_timeout 1200;
    }

    location / {
        try_files $uri $uri/ /index.php?$args;
    }

    # Rewrite robots.txt
    rewrite ^/robots.txt$ /index.php last;
}
Important Notes:
- fastcgi_pass is using the PHP-FPM 8.2 socket. If you’re using a different version, adjust the socket path accordingly (e.g.,
php8.3-fpm.sock). - Update server_name and root with your actual domain name and directory path.
I’ve commented out the two lines #ssl_certificate, which are for the SSL certificate. The website will still run on HTTPS, but there will be a red warning. You can follow the guide to install a free SSL certificate using Certbot [here]. Note that SSL can only be installed on a real VPS, not on localhost. However, there’s a trick: after successfully installing SSL on the VPS, you can download the fullchain.pem and privkey.pem files, and it will work just like it does on the actual server.
Enable the Configuration and Restart Nginx
After editing the configuration file, you need to enable it and restart Nginx.
❗ Skip this step if your nginx.conf already includes this line:include /etc/nginx/sites-available/*.conf;
To enable the config:
sudo ln -s /etc/nginx/sites-available/yourdomain.com.conf /etc/nginx/sites-enabled/Restart Nginx to apply the changes:
sudo service nginx restartIf you encounter any errors, run the following command to check the configuration:
sudo nginx -tFix any reported issues, then restart Nginx.
Make sure the service is active (active (running)) before proceeding to the next steps.
Use a Virtual Domain on Localhost
If you don’t have a domain and just want to run WordPress on your local machine (localhost), you can create a virtual domain (e.g., yourdomain.com). Follow these steps:
Open the /etc/hosts file for editing:
sudo nano /etc/hostsAdd this line at the end to map your virtual domain to localhost:
127.0.0.1 yourdomain.comSave and exit (Press Ctrl + S, then Ctrl + X).
Open your browser and visit the domain you configured (yourdomain.com). If everything is set up correctly, the WordPress installation page should appear.
Step 3: Create Database
To store data, WordPress needs a database and a MySQL user with proper permissions.
Log in to MySQL
First, access MySQL using the following command:
sudo mysqlIf MySQL requires a root password, use the -p option when logging in.
sudo mysql -u root -pCreate the Database and User
Once logged in, execute the following commands to:
✅ Create a new database
✅ Create a MySQL user
✅ Grant necessary permissions
CREATE DATABASE database_name;
CREATE USER "username"@"localhost" IDENTIFIED BY "password";
GRANT ALL PRIVILEGES ON database_name.* TO username@localhost IDENTIFIED BY "password";
FLUSH PRIVILEGES;
q;
💡 Important Notes:
- Replace
database_name,username, andpasswordwith actual values. - Avoid using weak passwords to enhance security.
- Run
FLUSH PRIVILEGES;to apply the changes.
At this point, your database is set up, and you’re ready to connect WordPress to it!
Step 4: Run Web Installer
Now that everything is configured, it’s time to complete the WordPress setup via the web interface.
Access the WordPress Installation Page
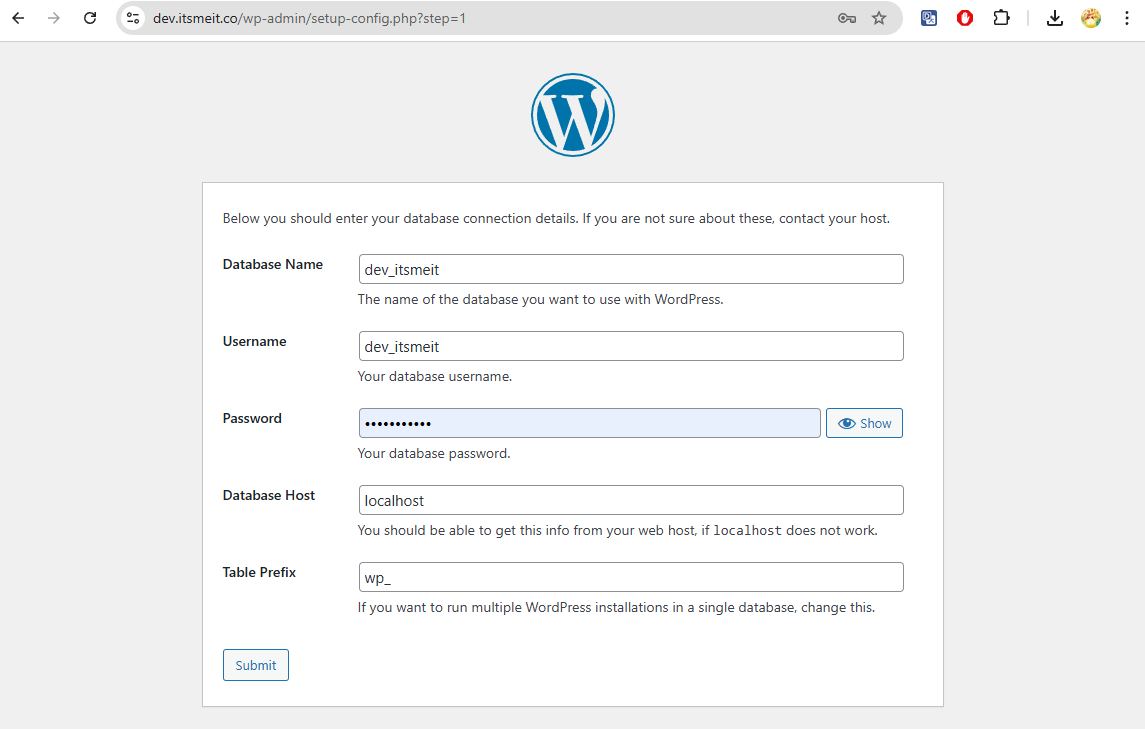
Open your browser and go to the domain you configured (e.g., http://yourdomain.com).
Click “Let’s go” to start the setup process.
Enter the database details created in Step 3:
✅ Database Name: Your database name
✅ Username: Your MySQL username
✅ Password: Your MySQL password

If you encounter a database connection error, double-check your credentials and try again.
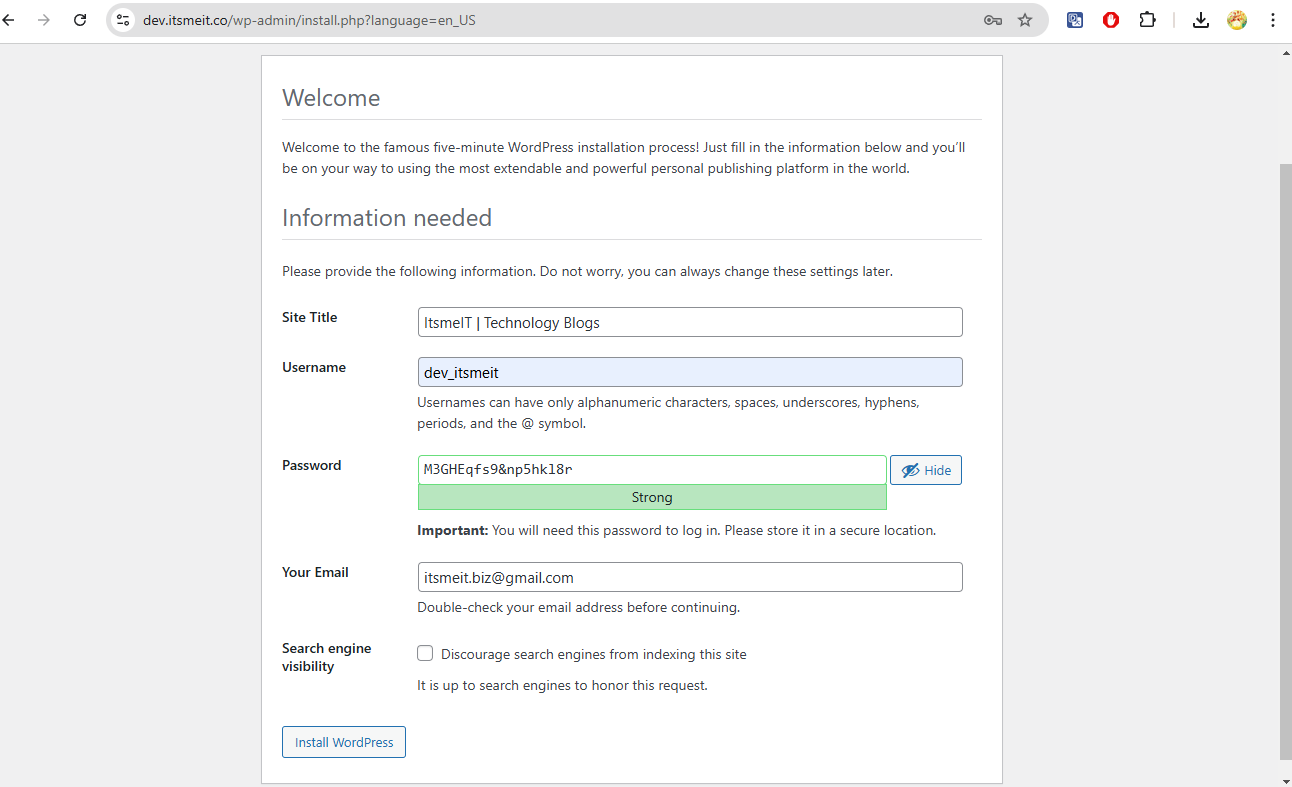
Configure Your Website Details
On the next screen, enter the following details:
✅ Site Title: Your website’s name
✅ Username: Admin login for WordPress
✅ Password: Secure password for WordPress admin
✅ Email: Your admin email address

📌 Important:
- Save your login details as you will need them to manage your website.
- If you don’t want Google to index your site yet, select “Discourage search engines from indexing this site.”
Once you’ve filled in all the details, click “Install WordPress.” If everything is correct, you’ll see a success message. You’ll be redirected to the login screen: http://yourdomain.com/wp-admin
Troubleshooting Common Issues
Fix 403 Forbidden or Permission Denied
Solution: Run these commands to set the correct ownership and permissions:
By default, PHP-FPM runs as the www-data user. However, it’s recommended to set the owner to your Ubuntu username (the one you use to SSH into the server), rather than root or www-data, to avoid permission issues later.
In my case, my user is itsmeit, so I use:
sudo chown -R itsmeit:www-data /var/www/vhosts/yourdomain.com/If you’re still facing permission-related errors with PHP, refer to this guide:
🔗 How to Fix PHP-FPM Permission Denied
Then, apply standard permissions for files and directories:
sudo find /var/www/vhosts/yourdomain.com/ -type f -exec chmod 644 {} +
sudo find /var/www/vhosts/yourdomain.com/ -type d -exec chmod 755 {} +
Nginx Configuration Errors
Issue: Restarting Nginx fails after editing the configuration file.
Solution: Run:
sudo nginx -tThis will display detailed errors. Fix the issues and test again until Nginx restarts successfully.
Everything is in place — you now have a working WordPress website running on your server.