Removing Ubuntu from a dual-boot system with Windows 10/11 on a UEFI (GPT) platform may seem complicated, but with a few careful steps and our guidance, you can easily complete the process, recovering storage space while keeping your Windows installation intact and secure.
Uninstall Ubuntu Dual-boot Windows
Note: Before we start, remember that removing Ubuntu from a dual-boot system involves restoring the Windows boot menu (which means removing GRUB) and deleting Ubuntu’s partitions. This will erase all data on those partitions, so make absolutely sure you have a backup of any important files.
Step 1. Restore Windows boot loader
To proceed, please download the Windows Boot Loader UEFI recovery file and extract it from the link provided at the end of the article. Once extracted, copy the “bootx64.efi” file to a designated drive, such as drive E. When using a UEFI system, You need to run Command Prompt with administrator privileges to be able to remove Ubuntu dual boot Windows 10 or 11.
To access the “Command Prompt”, locate “cmd” in the search bar and open it. Ensure that the Command Prompt is launched with administrative privileges by selecting “Run as administrator.” In the Command Prompt window, enter the following commands in sequence. To paste the code, either right-click and select “Paste” or press “Ctrl + V”.
mountvol W: /SLocate the disk where the Windows Boot Loader UEFI file was previously downloaded and extracted.
E:
xcopy /y bootx64.efi W:EFIBoot
rmdir /S W:EFIUbuntu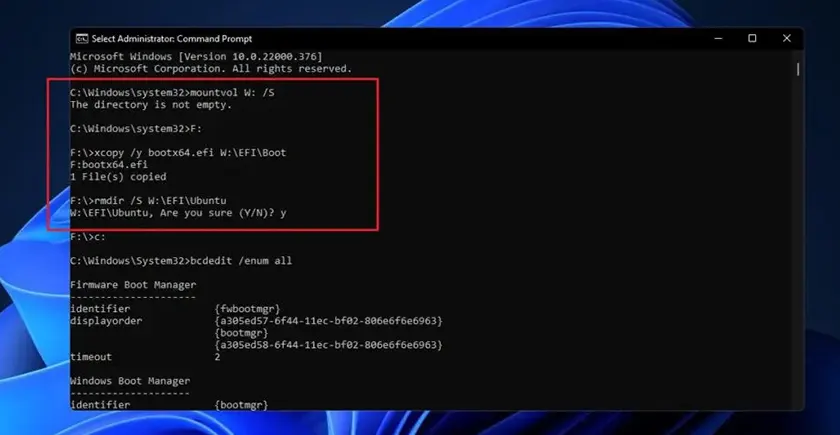
After restoring the default Windows bootloader, the next step is to delete the Ubuntu boot files from the EFI partition and the Ubuntu storage partitions.
Step 2. Using command BCDEdit to remove boot menu (UUID)
Next, it is necessary to remove the Ubuntu boot menu by identifying its UUID through the use of a specified command.
bcdedit /enum all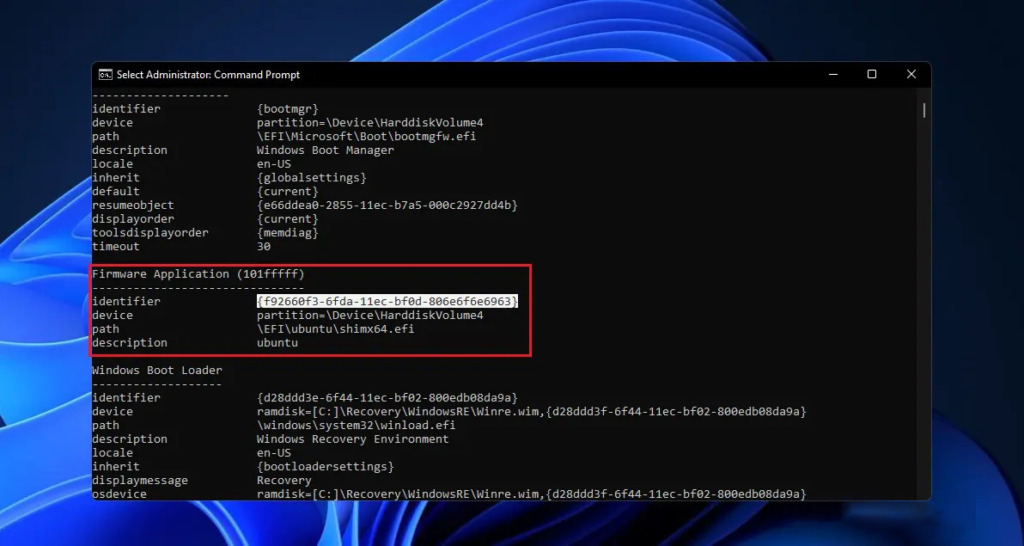
Enter the command “bcdedit /delete UUID” to delete the selected Ubuntu boot menu. If there are multiple UUIDs, repeat the process to remove them. Below is an example of deleting a UUID:
bcdedit /delete {d28ddd3f-6f44-11ec-bf02-800edb08da9a}After successfully removing the Ubuntu boot menu, you can proceed to step 3, deleting the partitions containing the operating system and completely removing Ubuntu dual-booting with Windows.
Step 3. Delete Ubuntu partition
To delete the Ubuntu partition, follow these steps on a Windows computer: right-click “This PC->Manage->Storage->Disk Management” Then proceed to delete the Ubuntu partitions, ensuring that they are indeed Ubuntu partitions, as indicated in the image below.
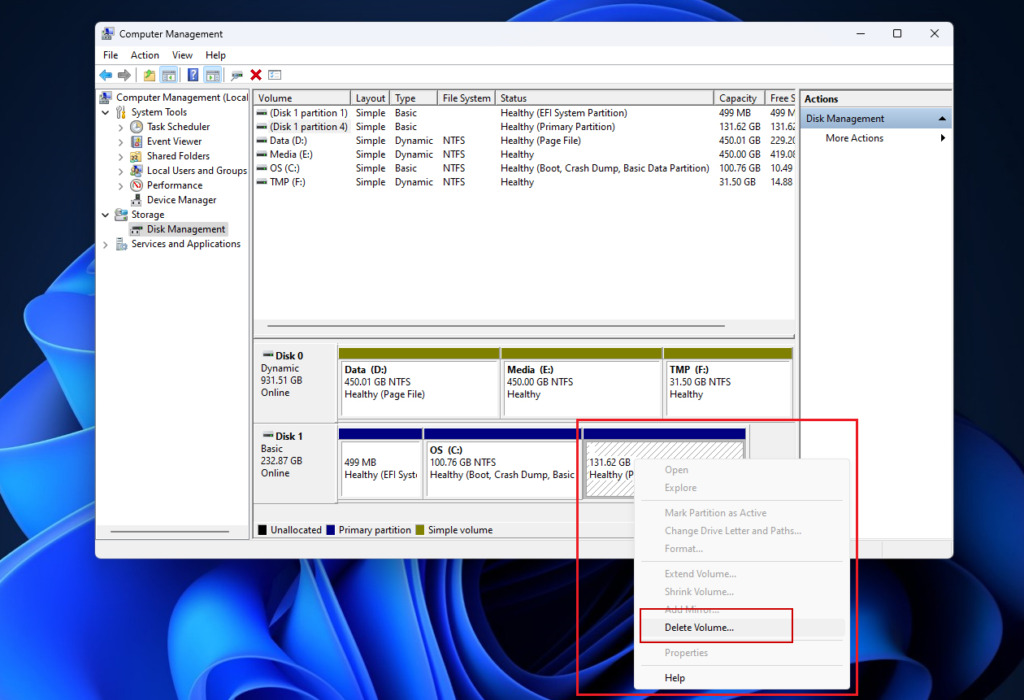
After deleting the partitions, you can close Disk Management. Your Windows system should now boot directly without the GRUB menu, and you’ll have reclaimed the disk space previously used by Ubuntu.