Securing your Nginx web server is essential for protecting your website from cyber threats, especially Distributed Denial-of-Service (DDoS) attacks. Below are key configurations to enhance your server’s security and reduce the risk of DDoS attacks or excessive requests.
1. Enhancing Nginx Security
The first step in securing your server is protecting against common vulnerabilities and malicious activities. These configurations should be placed inside the server {} block in your domain’s configuration file.
A. Hide Nginx Version Information
server_tokens off;: Disables the display of the Nginx version in HTTP headers. This helps prevent attackers from exploiting known vulnerabilities tied to specific versions.
B. Secure Sensitive Files and Directories
autoindex off;: Disables directory listing, returning a 403 Forbidden error if someone attempts to access directories without an index file. This adds extra protection for sensitive files.
C. Implement Security Headers
These headers help prevent various attacks, such as XSS, clickjacking, and man-in-the-middle attacks:
X-Frame-Options SAMEORIGIN;: Prevents clickjacking by restricting the embedding of your site in an iframe from other origins.Strict-Transport-Security "max-age=31536000";: Forces HTTPS usage for one year, improving security by preventing downgrade attacks.X-Content-Type-Options nosniff;: Prevents browsers from auto-detecting file types, reducing risks like MIME sniffing attacks.X-XSS-Protection "1; mode=block";: Enables XSS protection, blocking malicious scripts detected by the browser.
D. Check the results
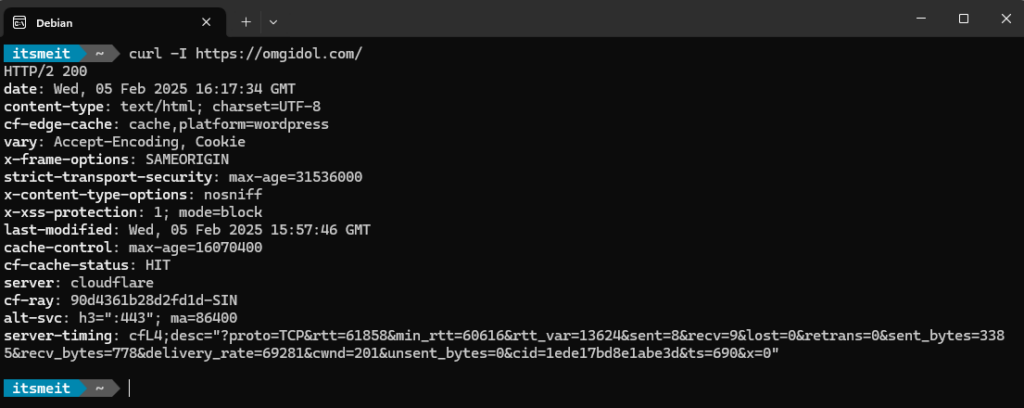
After making the security changes and restarting Nginx, you can check the results using the following command:
curl -I https://youdomain.com/The output will display important security headers, as shown in the screenshot:

You can also use tools like Security Headers (securityheaders.com) and Qualys SSL Labs (ssllabs.com) to help you check your security configuration.
2. Limiting Requests and Preventing DDoS Attacks
Next, configure Nginx to prevent overloading your server with excessive requests. This mitigates the impact of DDoS attacks and reduces exposure to malicious traffic.
A. Set Timeouts for Slow or Malicious Requests
Limit how long Nginx waits for client data, freeing up resources for legitimate users:
client_body_timeout 5s;: Closes the connection if the client takes longer than 5 seconds to send request data.client_header_timeout 5s;: Closes the connection if the client takes longer than 5 seconds to send headers.
B. Limit Request Rate to Prevent Abuse
Control how many requests a client can make in a specified time period:
- Define rate limit:
limit_req_zone $binary_remote_addr zone=one:10m rate=30r/m; - Apply to a location (e.g., login page):
location /wp-admin/ {
    limit_req zone=one;
}
C. Handle Traffic Bursts Efficiently
Allow brief traffic spikes while maintaining server performance:
limit_req zone=burst:10 nodelay;: Accepts up to 10 burst requests without delay.location / { limit_req zone=one burst=5; limit_req zone=burst burst=10 nodelay; }
D. Limit Simultaneous Connections per IP
Prevent abuse by limiting concurrent connections from a single IP:
- Define connection limit:
limit_conn_zone $binary_remote_addr zone=addr:10m; - Set connection limit:
location /store/ { limit_conn addr 10; }
E. Block Malicious IPs During DDoS Attacks
Block IPs responsible for DDoS attacks to mitigate their impact:
- Block specific IPs:
location / { deny 123.123.123.0/28; } - Block multiple IPs:
location / { deny 123.123.123.3; deny 123.123.123.5; deny 123.123.123.7; }
Additionally, configuring Nginx to block direct IP access to the server is essential for protecting the system from attacks and enhancing security by forcing users to access the site through the official domain.
3. Monitoring and Responding to DDoS Attacks
A. Monitoring Tools
Use these tools to detect and respond to DDoS attacks:
- Nginx Amplify: Provides real-time metrics and alerts.
- Fail2Ban: Automatically blocks IPs based on predefined rules.
- Logwatch: Helps analyze server logs for unusual patterns.
B. Responding to DDoS Attacks
Take these steps when a DDoS attack is detected:
- Identify the attack: Use monitoring tools to pinpoint the source and type.
- Block malicious IPs: Update your Nginx configuration to block those IPs.
- Rate limiting: Adjust rate-limiting settings to restrict requests further.
- Contact your ISP: Notify your Internet Service Provider for possible network-level mitigation.
- Use a DDoS protection service: Consider services like Cloudflare or Akamai.
4. Advanced DDoS Attack Prevention
A. SYN Flood Protection
- Enable SYN cookies: Add the following to
/etc/sysctl.conf:net.ipv4.tcp_syncookies = 1 - Increase the backlog queue:
net.ipv4.tcp_max_syn_backlog = 2048
B. UDP Flood Protection
- Disable unused UDP services: Ensure all unused UDP services are turned off.
- Rate limit UDP traffic:
iptables -A INPUT -p udp -m limit --limit 5/s -j ACCEPT
C. Application Layer (Layer 7) Attacks
- Web Application Firewall (WAF): Implement a WAF to filter malicious traffic.
- Behavioral analysis: Use tools that analyze traffic patterns to detect and block suspicious activity.
By applying these Nginx security and rate-limiting configurations, you can significantly strengthen your web server against common vulnerabilities and DDoS attacks. For an extra layer of protection, consider leveraging DDoS mitigation services like Cloudflare.
Regular monitoring, prompt responses to threats, and consistent updates to your server configurations are key to maintaining a secure, reliable server environment.